上一篇主要说到了spring security和mybatis-plus的使用,当然都是使用过程中的一些描述,可能在理解上与实际有一些出入,毕竟是学习的过程,循序渐渐才更有价值。
其实后台的服务基本在之前的基础上已经有了,现在的关键就是前段的界面与后台的集成,当然现在很多应用前后端都已经分离,当我们作为两个服务去部署时,其实又会有很多新问题需要处理,同时会有更多的知识需要去了解,当然毕竟在目前阶段这不属于核心的东西,所有此次依旧将前端代码与后台带打包在一起使用。
一直说到使用vue,其实很早就接触过,但确实也没怎么去使用,一是因为目前工作环境影响;其次前端框架太多,在选择上没有做过过多的评估与对比,所以一直不知道选用什么样的框架与当前工作内容更贴切 。当然由于现在不是vue的教学,我们需要的是一个成型的界面,可供操作,所以vue只是其中的一个技术点,在项目中会结合thymeleaf与ivew来使用。
项目结构大致如下:
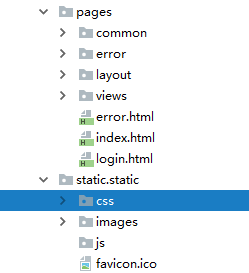
其中pages存放的是页面相关内容,static则是一些js、css等,由于我们引入了安全框架,同时由于权限配置关系,导致所有的脚步样式图片等资源都会被拦截,因此我们有必要忽略这些镜头资源,在WebSecurityConfigurerAdapter的子类中配置即可:
@Override
public void configure(WebSecurity web) throws Exception {
    web.ignoring().antMatchers("/static/**").antMatchers("/favicon.ico")
            .mvcMatchers("/webjars/**")
            .mvcMatchers("/js/**")
            .mvcMatchers("/css/**");
}
为什么把pages分了这么多,主要是将一个完整的html页面进行了分割,比如头部分,会引入css以及一些其他相关配置,页面也会有相应的布局,比如分为上下左中几个部分,其实只是做了一下分离,这个完全是因人而异。
可以看下common:
<html xmlns="http://www.w3.org/1999/xhtml" xmlns:th="http://www.thymeleaf.org">
    <body>
        <th:block th:fragment="common-css">
            <link rel="stylesheet" th:href="@{/webjars/iview/dist/styles/iview.css}">
            <link rel="stylesheet" th:href="@{/static/css/main.css}">
        </th:block>

        <th:block th:fragment="common-js">
            <!-- import vue-->
            <script type="text/javascript" th:src="@{/webjars/vue/dist/vue.min.js}"></script>
            <!-- import axios -->
            <script type="text/javascript" th:src="@{/webjars/axios/dist/axios.min.js}"></script>
            <!-- import iView -->
            <script type="text/javascript" th:src="@{/webjars/iview/dist/iview.min.js}"></script>
            <!-- i18n -->
            <script type="text/javascript" th:src="@{/webjars/iview/dist/locale/zh-CN.js}"></script>
        </th:block>
    </body>
</html>
因为是通过webjars引入的前端依赖库,所有都是通过maven来管理的:
<dependency>
    <groupId>org.webjars</groupId>
    <artifactId>webjars-locator</artifactId>
    <version>0.32-1</version>
</dependency>
<dependency>
    <groupId>org.webjars.npm</groupId>
    <artifactId>vue</artifactId>
    <version>2.6.10</version>
</dependency>
<dependency>
    <groupId>org.webjars.npm</groupId>
    <artifactId>iview</artifactId>
    <version>3.4.0</version>
</dependency>
<dependency>
    <groupId>org.webjars.bower</groupId>
    <artifactId>axios</artifactId>
    <version>0.17.1</version>
</dependency>
<dependency>
    <groupId>org.webjars.bower</groupId>
    <artifactId>jquery</artifactId>
    <version>3.4.1</version>
</dependency>
这里没有使用vue的一些脚手架,主要也是用最基本的功能区完成一些效果,主要是为了使用与理解。这里要提到webjars-locator这样一个jar,帮助我们处理了所有版本问题,所以在引入的时候不会有相关的版本信息在路径中。
其次核心的框子都在layout.html中,主要帮我们完成了布局,菜单数据加载,以及以下菜单路由相关的工作:
<head>
    <title th:text="管理系统"></title>
    <meta charset="utf-8">
    <meta http-equiv="X-UA-Compatible" content="IE=edge">
    <meta name="viewport" content="width=device-width, initial-scale=1">
    <link rel="Shortcut Icon" href="favicon.ico">
    <!-- import css -->
    <div th:replace="common/commons::common-css"></div>
    <!-- import js -->
    <div th:replace="common/commons::common-js"></div>
    <script type="text/javascript" th:inline="javascript">
        iview.lang('zh-CN');
        /*<![CDATA[*/
            window['contextPath'] = /*[[@{/}]]*/
        /*]]>*/
    </script>
</head>

<body>
    <div id="app" class="layout layout-full">
        <layout class="menu-container">
            <header v-cloak>
                <i-menu mode="horizontal" theme="dark" active-name="1">
                    <div class="layout-logo"><span class="log-text">管理系统</span></div>
                    <div class="layout-nav">
                        <menu-item name="1">
                            <icon type="ios-notifications-outline"></icon>
                            消息
                        </menu-item>
                        <menu-item name="2">
                            <icon type="md-volume-down" />
                            提醒
                        </menu-item>
                        <menu-item name="3">
                            <icon type="ios-mail-outline"></icon>
                            邮件
                        </menu-item>
                    </div>
                    <divider type="vertical" />
                </i-menu>
                <i-menu mode="horizontal" theme="dark" class="layout-header-rignt">
                    <div class="">
                        <menu-item>
                            <span>管理员</span>
                        </menu-item>
                        <menu-item>
                            <icon type="md-exit" style="font-size: 18px"></icon>
                            <a th:href="@{/logout}"></a>
                        </menu-item>
                    </div>
                </i-menu>
            </header>
            <layout>
                <sider hide-trigger :style="{background: '#fff'}" class="layout-menu">
                    <!--@on-select="goPage"-->
                    <i-menu ref="side_menu" :open-names="openNames" :active-name="activeName"  theme="light" width="auto" accordion  class="app-left">
                        <submenu v-for="menu in menus" :name="menu.id" v-cloak>
                            <template slot="title">
                                <icon :type="menu.style"></icon>
                                {{menu.name}}
                            </template>
                            <!--@click.native="goPage"-->
                            <menu-item v-for="m in menu.children" :name="m.id" :to="m.path">{{m.name}}</menu-item>
                        </submenu>
                    </i-menu>
                </sider>
                <layout :style="{padding: '0 24px 24px'}">
                    <breadcrumb :style="{margin: '24px 0','padding-left': '200px',position: 'absolute',top: '60px'}" v-cloak>
                        <breadcrumb-item v-for="menu in menuNav">{{menu}}</breadcrumb-item>
                    </breadcrumb>
                    <content class="app-main">
                        <div th:replace="::app-content"></div>
                    </content>
                </layout>
            </layout>
        </layout>
    </div>
<script th:inline="javascript">
    var vm = new Vue({
        el:'#app',
        data(){
            return {
                menus:[],
                openNames:[],
                activeName:'',
                menuNav:['主页']
            };
        },
        created:function () {
            var that = this;
            /*<![CDATA[*/
                var _menuNav = /*[[${menuNav}]]*/
                    _openNames = /*[[${openNames}]]*/
                    _activeName = /*[[${activeName}]]*/
                _menuNav && (this.menuNav = _menuNav);
                _openNames && (this.openNames = _openNames);
                _activeName && (this.activeName = _activeName);
            /*]]>*/
            axios.get(contextPath+'system/menu/tree')
                .then(function (res) {
                    that.menus = res.data;
                    //自动构建的菜单需要加上处理
                    that.$nextTick(() => {
                        that.$refs.side_menu.updateOpened()
                        that.$refs.side_menu.updateActiveName()
                    })
                });
        },
        methods:{
            goPage:function (name) {
                // window.location.hash = name;
                // name && (window.location.href = name);
            }
        }
    });

</script>
</body>
可以看下,最先引入了我们在common中的css与js,之后用到了iview,其实就是在布局中拷贝了一个,进行了简单的修改,然后有几点需要说明的:
1、记得一定需要使用new Vue({el:''}),对页面元素处理,这样相关的组件才能进行渲染,因为页面中使用了iview的自定义组件,但又是基于vue的,所以这个必须要加上。
2、页面中一些动态的数据,比如菜单数据、样式相关的配置属性、导航属性等,要优先定义,在之后的页面操作中,进行修改这些属性即可实现动态效果,这个看vue的教程即可。
3、web项目上下文路径会随部署而变化,在thymeleaf中,我们可以通过这样获取,前提是script标签需要th:inline="javascript"声明:
window['contextPath'] = [[@{/}]]
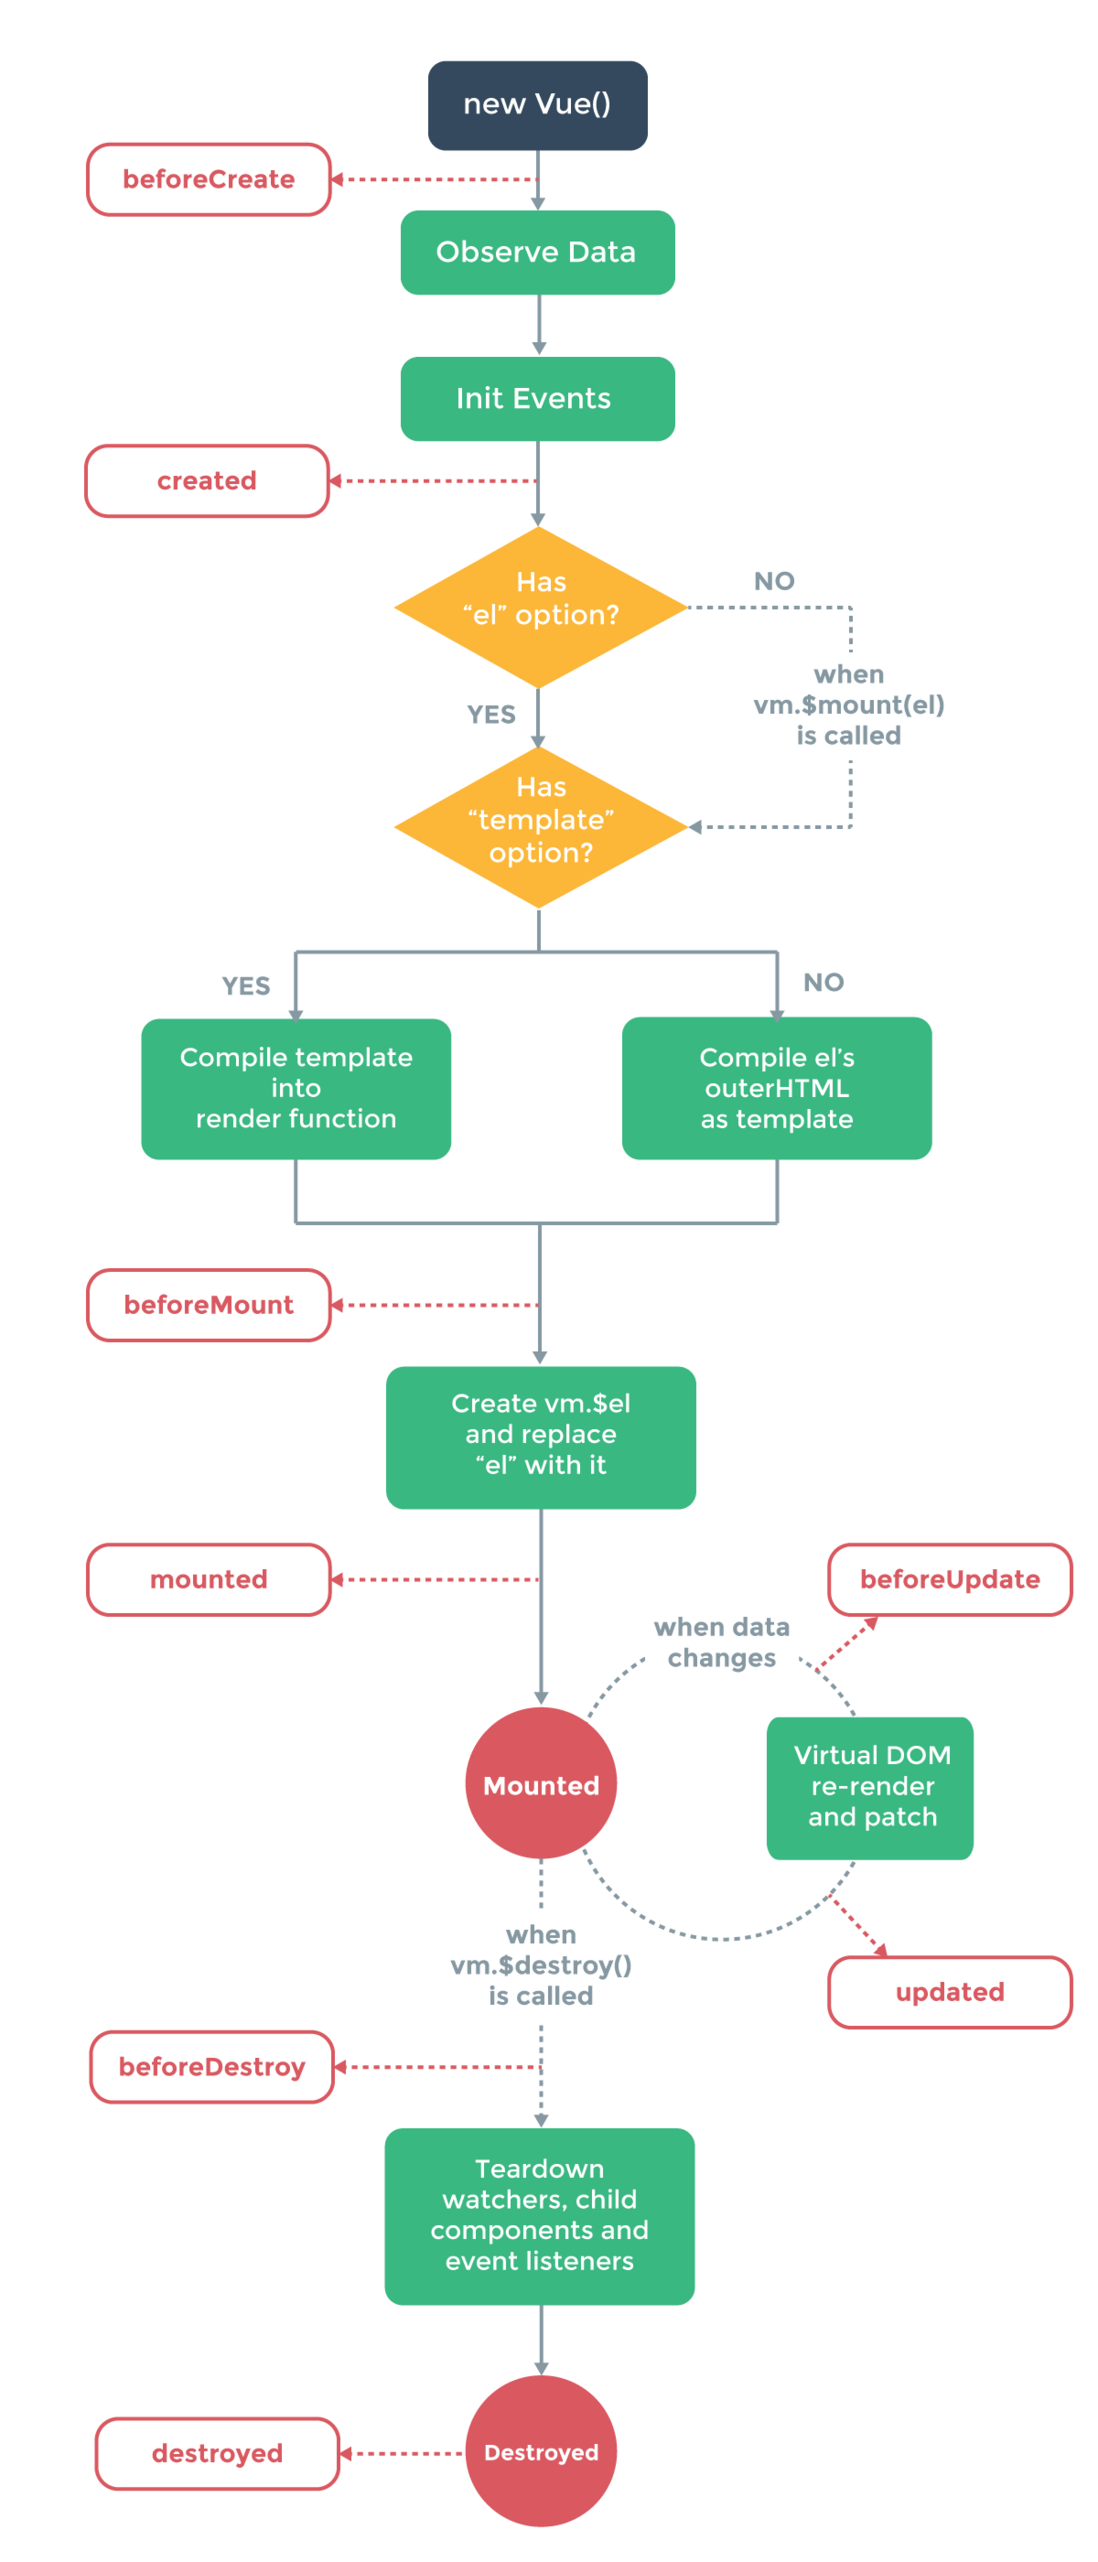
4、围绕vue的生命周期,有很多钩子函数可以在其创建过程中完成我们自定义的修改
5、菜单的路由主要根据iview的提供的属性进行了处理,其中:to会将该元素渲染成a标签,最后其实是全局刷新,其实每个模块就是一个新地址,
<menu-item v-for="m in menu.children" :name="m.id" :to="m.path">{{m.name}}</menu-item>
这个不同于之前的做法,将整个项目作为一个页面,将子页面全部嵌入到注页面中,这次主要是通过layout.html作为一个模板,所有的子页面内容都是加载到
<content class="app-main">
    <div th:replace="::app-content"></div>
</content>
中,同时页面会重新定位,而我们真正的页面则是这样的:
<!DOCTYPE html>
<html xmlns="http://www.w3.org/1999/xhtml" xmlns:th="http://www.thymeleaf.org"
      xmlns:layout="http://www.ultraq.net.nz/thymeleaf/layout"
      layout:decorator="layout/layout">

    <div th:fragment="app-content">
        index
    </div>

</html>
其实前端的构建大致也就是这样,当然会有很多细节,在真正去构建的时候都会遇到各种问题,当然,遇到问题解决问题,这样的方式能够更快的了解并使用新的技术。
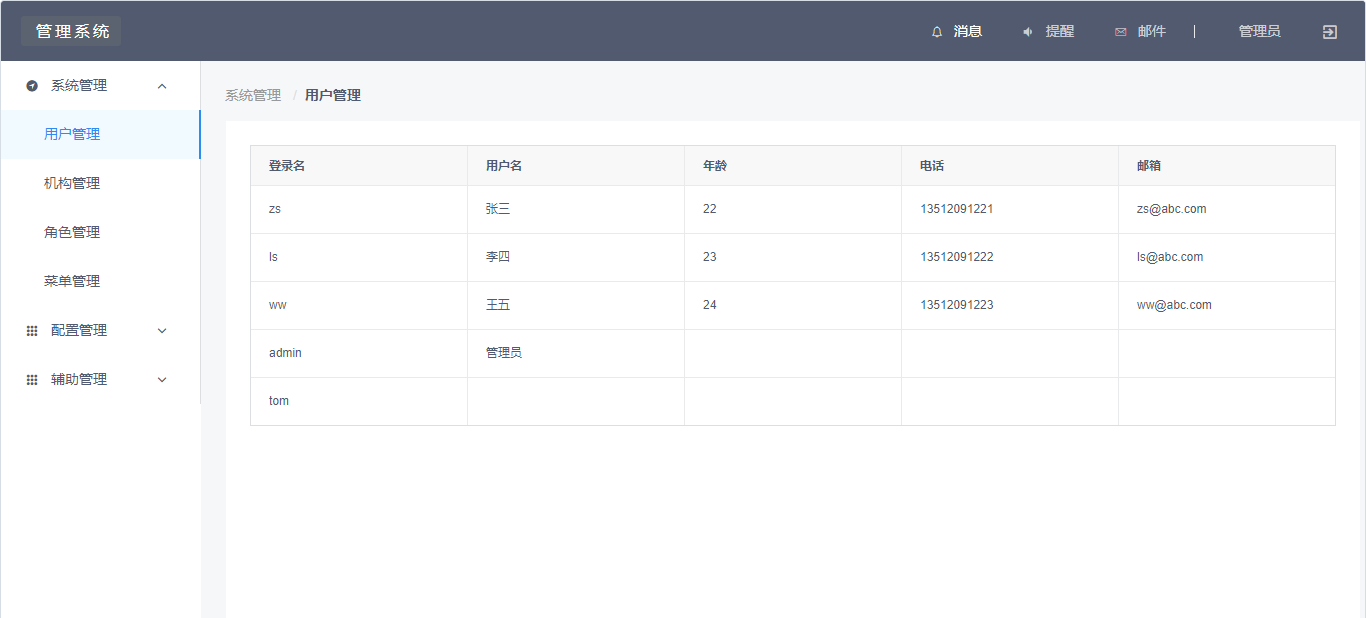
目前只是完成了一个用户查询的界面:
<div th:fragment="app-content">
    <div id="user">
        <i-table border
                 :columns="columns"
                 :data="users">
        </i-table>
    </div>
    <script th:src="@{/webjars/jquery/dist/jquery.min.js}"></script>
    <script>
        new Vue({
            el: '#user',
            data() {
                return {
                    users: [],
                    columns: [
                        {
                            title: '登录名',
                            key: 'username'
                        },
                        {
                            title: '用户名',
                            key: 'userCaption'
                        },
                        {
                            title: '年龄',
                            key: 'age'
                        },
                        {
                            title: '电话',
                            key: 'telephone'
                        },
                        {
                            title: '邮箱',
                            key: 'email'
                        }
                    ]
                }
            },
            created(){
                this.getUsers();
            },
            methods: {
                getUsers:function () {
                    var that = this;
                    //异步加载无数据!!
                    // axios.get(contextPath+'system/user')
                    //     .then(function (res) {
                    //         that.users = res.data;
                    //     })
                    $.ajax({
                        url:contextPath+'system/user',
                        async:false,
                        success:function(res){
                            that.users = res;
                        }
                    })
                }
            }
        });
    </script>
</div>
界面大致这样:
 当然这样有个问题一直不知道什么原因,因为请求时使用的是axios,其中users数据一直无法和页面实现双向绑定。
代码:https://github.com/suspring/springboot-mybatisplus-security-ms.git
下一次看下消息队列把...

