3 Spring Boot简介与配置
本书代码共享地址:https://gitee.com/yangenxiong/SpringCloud
本章要点
Spring Boot简介
Spring Boot使用
3.1 Spring Boot
Spring Cloud基于Spring Boot搭建,本小节将对Spring Boot作一个大致的讲解,读者知道Spring Boot作用即可。
3.1.1 Spring Boot简介
开发一个全新的项目,需要先进行开发环境的搭建,例如要确定技术框架以及版本,还要考虑各个框架之间的版本兼容问题,完成这些繁琐的工作后,还要对新项目进行配置,测试能否正常运行,最后才将搭建好的环境提交给项目组的其他成员使用。经常出现的情形是,表面上已经成功运行,但部分项目组成员仍然无法运行,项目初期浪费大量的时间做这些工作,几乎每个项目都会投入部分工作量来做这些固定的事情。
受Ruby On Rails、Node.js等技术的影响,JavaEE领域需要一种更为简便的开发方式,来取代这些繁琐的项目搭建工作。在此背景下,Spring推出了Spring Boot项目,该项目可以让使用者更快速的搭建项目,使用者可以更专注、快速的投入到业务系统开发中。系统配置、基础代码、项目依赖的jar包,甚至是开发时所用到的应用服务器等,Spring Boot已经帮我们准备好,只要在建立项目时,使用构建工具加入相应的Spring Boot依赖包,项目即可运行,使用者无需关心版本兼容等问题。
Spring Boot支持Maven和Gradle这两款构建工具。Gradle使用Groovy语言进行构建脚本的编写,与Maven、Ant等构建工具有良好的兼容性。鉴于笔者使用Maven较多,因此本书使用Maven作为项目构建工具。笔者成书时,Spring Boot最新的正式版本为1.5.4,要求Maven版本为3.2或以上。
3.1.2 新建Maven项目
在新建菜单中选择新建“Maven Project”,填写的项目信息如图2-5所示。
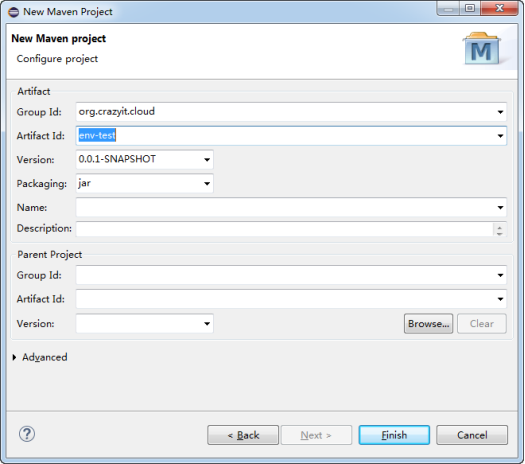
图2-5 新建Maven项目
为了测试项目的可用性,加入Spring Boot的web启动模块,让该项目具有Web容器的功能,pom.xml文件内容如代码清单2-1所示。
代码清单2-1:codes\02\env-test\pom.xml
<project xmlns="http://maven.apache.org/POM/4.0.0" xmlns:xsi="http://www.w3.org/2001/XMLSchema-instance" xsi:schemaLocation="http://maven.apache.org/POM/4.0.0 http://maven.apache.org/xsd/maven-4.0.0.xsd"> <modelVersion>4.0.0</modelVersion> <groupId>org.crazyit.cloud</groupId> <artifactId>env-test</artifactId> <version>0.0.1-SNAPSHOT</version> <dependencies> <dependency> <groupId>org.springframework.boot</groupId> <artifactId>spring-boot-starter-web</artifactId> <version>1.5.4.RELEASE</version> </dependency> </dependencies> </project>
配置完依赖后,该依赖会自动帮我们的项目加上其他的Spring模块以及所依赖的第三方包,例如spring-core、sprin-beans、spring-mvc等,除了这些模块外,还加入了嵌入式的Tomcat。
3.1.3 编写启动类
加入了依赖后,只需要编写一个简单的启动类,即可启动Web服务,启动类如代码清单2-2所示。
代码清单2-2:codes\02\env-test\src\main\java\org\crazyit\cloud\MyApplication.java
package org.crazyit.cloud; import org.springframework.boot.SpringApplication; import org.springframework.boot.autoconfigure.SpringBootApplication; import org.springframework.context.annotation.ComponentScan; @SpringBootApplication @ComponentScan public class MyApplication { public static void main(String[] args) { SpringApplication.run(MyApplication.class, args); } }
MyApplication类使用了@SpringBootApplication注解,该注解声明了该类是一个Spring Boot应用,该注解具有“@SpringBootConfiguration、@EnableAutoConfiguration、@ComponentScan”等注解的功能。直接运行MyApplication的main方法,看到以下输出信息后,证明成功启动:
2017-08-02 20:53:05.327 INFO 1976 --- [ main] o.s.w.s.handler.SimpleUrlHandlerMapping : Mapped URL path [/**/favicon.ico] onto handler of type [class org.springframework.web.servlet.resource.ResourceHttpRequestHandler] 2017-08-02 20:53:05.530 INFO 1976 --- [ main] o.s.j.e.a.AnnotationMBeanExporter : Registering beans for JMX exposure on startup 2017-08-02 20:53:05.878 INFO 1976 --- [ main] s.b.c.e.t.TomcatEmbeddedServletContainer : Tomcat started on port(s): 8080 (http) 2017-08-02 20:53:05.885 INFO 1976 --- [ main] org.crazyit.cloud.MyApplication : Started MyApplication in 5.758 seconds (JVM running for 6.426)
根据输出信息可知,启动的Tomcat端口为8080,打开浏览器访问:http://localhost:8080,可以看到错误页面,表示应用已经成功启动。
3.1.4 编写控制器
在前面小节加入的spring-boot-starter-web模块,默认集成了SpringMVC,因此只需要编写一个Controller,即可实现一个最简单的HelloWord程序,代码清单2-3为控制器。
代码清单2-3:codes\02\env-test\src\main\java\org\crazyit\cloud\MyController.java
package org.crazyit.cloud; import org.springframework.http.MediaType; import org.springframework.web.bind.annotation.GetMapping; import org.springframework.web.bind.annotation.PathVariable; import org.springframework.web.bind.annotation.RequestMapping; import org.springframework.web.bind.annotation.RequestMethod; import org.springframework.web.bind.annotation.ResponseBody; import org.springframework.web.bind.annotation.RestController; @RestController public class MyController { @GetMapping("/hello") @ResponseBody public String hello() { return "Hello World"; } }
代码清单2-3中使用了@Controller注解来修饰MyController,由于启动类中使用了@SpringBootApplication注解,该注解含有@ComponentScan的功能,因此@Controller会被扫描并注册。在hello方法中使用了@GetMapping与@ResponseBody注解,声明hello方法的访问地址以及返回内容。重新运行启动类,打开浏览器并访问以下地址:http://localhost:8080/hello,可以看到控制器的返回。
3.1.5 发布REST WebService
Spring MVC支持直接发布REST风格的WebService,新建测试的对象Person,如代码清单2-4所示。
代码清单2-4:codes\02\env-test\src\main\java\org\crazyit\cloud\Person.java
package org.crazyit.cloud; public class Person { private Integer id; private String name; private Integer age; public Integer getId() { return id; } public void setId(Integer id) { this.id = id; } public String getName() { return name; } public void setName(String name) { this.name = name; } public Integer getAge() { return age; } public void setAge(Integer age) { this.age = age; } }
修改控制器类,修改后如代码清单2-5。
代码清单2-5:codes\02\env-test\src\main\java\org\crazyit\cloud\MyController.java
package org.crazyit.cloud; import org.springframework.http.MediaType; import org.springframework.web.bind.annotation.GetMapping; import org.springframework.web.bind.annotation.PathVariable; import org.springframework.web.bind.annotation.RequestMapping; import org.springframework.web.bind.annotation.RequestMethod; import org.springframework.web.bind.annotation.ResponseBody; import org.springframework.web.bind.annotation.RestController; @RestController public class MyController { @GetMapping("/hello") @ResponseBody public String hello() { return "Hello World"; } @RequestMapping(value = "/person/{personId}", method = RequestMethod.GET, produces = MediaType.APPLICATION_JSON_VALUE) public Person findPerson(@PathVariable("personId") Integer personId) { Person p = new Person(); p.setId(personId); p.setName("Crazyit"); p.setAge(30); return p; } }
MyController类中,将原来的@Controller注解修改为@RestController,新建findPerson方法,该方法将会根据参数id来创建一个Person实例并返回,访问该方法将会得到JSON字符串。运行启动类,在浏览器中输入:http://localhost:8080/person/1,可看到接口返回以下JSON字符串:
{"id":1,"name":"Crazyit","age":30}
调用REST服务的方式有很多,此部分内容将在后面章节中讲述。
3.2 Spring Boot配置文件
Spring Cloud基于Spring Boot构建,很多模块的配置均放在Spring Boot的配置文件中,因此有必要了解一下Spring Boot的配置文件规则,为学习后面的章节打下基础。
3.2.1 默认配置文件
Spring Boot会按顺序读取各种配置,例如命令行参数、系统参数等,本章只讲述配置文件的参数读取。默认情况下,Spring Boot会按顺序到以下目录读取application.properties或者application.yml文件:
项目根目录的config目录。
项目根目录。
项目classpath下的config目录。
项目classpath根目录。
如对以上描述有疑问,可参看图2-6。
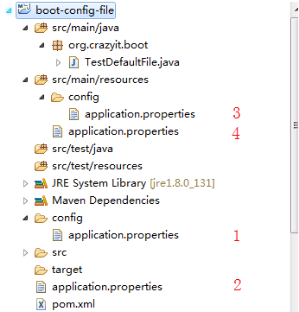
图2-6 配置文件读取顺序
图2-6中的数字为文件的读取顺序,本小节使用的boot-config-file项目依赖了spring-boot-starter-web项目,为pom.xml加入以下依赖:
<dependency> <groupId>org.springframework.boot</groupId> <artifactId>spring-boot-starter-web</artifactId> <version>1.5.4.RELEASE</version> </dependency>
3.2.2 指定配置文件位置
如果想自己指定配置文件,可以在Spring容器的启动命令中加入参数,例子如代码清单2-6所示。
代码清单2-6:codes\02\boot-config-file\src\main\java\org\crazyit\boot\TestDefaultFile.java
package org.crazyit.boot; import org.springframework.boot.autoconfigure.SpringBootApplication; import org.springframework.boot.builder.SpringApplicationBuilder; import org.springframework.context.ConfigurableApplicationContext; @SpringBootApplication public class TestDefaultFile { public static void main(String[] args) { ConfigurableApplicationContext context = new SpringApplicationBuilder( TestDefaultFile.class) .properties( "spring.config.location=classpath:/test-folder/my-config.properties") .run(args); // 输出变量 System.out.println(context.getEnvironment().getProperty("jdbc.user")); }
TestDefaultFile类,在使用SpringApplicationBuilder时,配置了spring.config.location属性来设定需要读取的配置文件。
3.2.3 yml文件
YAML语言使用一种方便的格式的来进行数据配置,通过配置分层、缩进,在很大程度上增强了配置文件的可读性,使用YAML语言的配置文件以“.yml”作为后缀。代码清单2-7为一份yml配置文件。
代码清单2-7:codes\02\boot-config-file\src\main\resources\my-config.yml
jdbc: user: root passwd: 123456 driver: com.mysql.jdbc.Driver
在此,需要注意的是,每一行配置的缩进要使用空格,不要使用tab键进行缩进。代码清单2-7对应的properties文件内容如下:
jdbc.user=root jdbc.passwd=123456 jdbc.driver=com.mysql.jdbc.Driver
3.2.4 运行时指定profiles配置
如果在不同的环境下激活不同的配置,可以使用profiles,代码清单2-8中配置了两个profiles。
代码清单2-8:codes\02\boot-config-file\src\main\resources\test-profiles.yml
spring: profiles: mysql jdbc: driver: com.mysql.jdbc.Driver --- spring: profiles: oracle jdbc: driver: oracle.jdbc.driver.OracleDriver
定义了mysql与oracle两个profiles,profiels间使用“---”进行分隔,在Spring容器启动时,使用spring.profiles.active来指定激活哪个profiles,如代码清单2-9所示。
代码清单2-9:codes\02\boot-config-file\src\main\java\org\crazyit\boot\TestProfiles.java
package org.crazyit.boot; import org.springframework.boot.autoconfigure.SpringBootApplication; import org.springframework.boot.builder.SpringApplicationBuilder; import org.springframework.context.ConfigurableApplicationContext; @SpringBootApplication public class TestProfiles { public static void main(String[] args) { ConfigurableApplicationContext context = new SpringApplicationBuilder( TestProfiles.class) .properties( "spring.config.location=classpath:/test-profiles.yml") .properties("spring.profiles.active=oracle").run(args); // 输出变量 System.out.println(context.getEnvironment().getProperty("jdbc.driver")); // 启动第二个Spring容器,指定端口为8081 ConfigurableApplicationContext context2 = new SpringApplicationBuilder( TestProfiles.class) .properties( "spring.config.location=classpath:/test-profiles.yml") .properties("spring.profiles.active=mysql").properties("server.port=8081").run(args); // 输出变量 System.out.println(context2.getEnvironment().getProperty("jdbc.driver")); } }
对Spring Boot的配置文件有一定了解后,对后面章节Spring Cloud的配置内容就不会陌生。
3.2.5 热部署
每次修改Java后,都需要重新运行Main方法才能生效,这样的会降低开发效果,我们可以使用Spring Boot提供的开发工具来实现热部署,为项目加上以下依赖:
<dependency> <groupId>org.springframework.boot</groupId> <artifactId>spring-boot-devtools</artifactId> </dependency>
当Java文件修改后,容器会重新加载本项目的Java类。
3.3 小结
本文主要讲述了本书基础环境的搭建,读者主要掌握Maven的使用,本书的案例几乎都是Maven项目。Spring Cloud项目以Spring Boot作为基础进行构建,本书的大部分案例也是基于Spring Boot,本章对Spring Boot作了大致的讲解,并且配合一个Hello World例子来演示Spring Boot的便捷,学习完本章后,读者知道Spring Boot的大致功能,即可达到目标。

