假设项目需要分3个环境配置:dev、test、prd, 对于springboot的项目, 可以使用以下方式:
1, 使用springboot自己的profile
springboot的多环境配置文件名必须约定满足application-{profile}.properties的格式, 如:
然后需要设置spring.profiles.active的值,才可以激活对应的profile.
我们可以在application.properties文件中激活, 如:
spring.profiles.active=dev
也可以在运行jar包时激活, 会覆盖上面的, 如:
java -jar hello.jar --spring.profiles.active=test 或者 java -Dspring.profiles.active=test -jar hello.jar
注解@Profile介绍:
在springboot中开发java组件时,可以通过@Profile决定该类是否实例化, @Profile(“dev”)表示只有spring.profiles.active=dev时,才会去实例化当前类 , 可以用在一些场景中, 比如: 在开发测试环节, 需要屏蔽掉发短信接口. 我们可以参考下面的代码:
public interface SmsService { void send(); } @Service @Profile({"dev","test"}) public class DevTestSmsServiceImpl implements SmsService { @Override public void send() { System.out.println("开发测试阶段不需要发真实短信"); } } @Service @Profile("prd") public class PrdSmsServiceImpl implements SmsService { @Override public void send() { System.out.println("调用真实短信接口"); } }
2, 使用打包工具的profile
关于springboot的profile,有人会觉得它有以下两点不好:
a) 对配置文件路径和命名的约定, 造成了很大的不灵活性.
b) 把所有配置文件不分环境青红皂白地都打进jar包有点太粗暴.
于是我们可以回到传统的做法上来, 使用打包工具的profile, 在打包阶段即划清各个环境.
maven profile ( http://maven.apache.org/guides/introduction/introduction-to-profiles.html )
maven profile的使用方式有很多, 这里选取常用的一种, 在pom里配置好profile, 在mvn打包时激活.
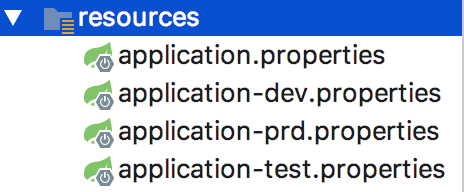
pom文件, 如:
<?xml version="1.0" encoding="UTF-8"?> <project xmlns="http://maven.apache.org/POM/4.0.0" xmlns:xsi="http://www.w3.org/2001/XMLSchema-instance" xsi:schemaLocation="http://maven.apache.org/POM/4.0.0 http://maven.apache.org/xsd/maven-4.0.0.xsd"> <modelVersion>4.0.0</modelVersion> <groupId>com.wx</groupId> <artifactId>hello</artifactId> <version>1.0-SNAPSHOT</version> <parent> <groupId>org.springframework.boot</groupId> <artifactId>spring-boot-starter-parent</artifactId> <version>1.5.12.RELEASE</version> </parent> <dependencies> <dependency> <groupId>org.springframework.boot</groupId> <artifactId>spring-boot-starter-web</artifactId> </dependency> </dependencies> <!--定义3个profile--> <profiles> <profile> <id>dev-profile</id> <activation> <property> <name>maven.profile.env</name> <value>dev</value> </property> <activeByDefault>true</activeByDefault> </activation> <properties> <env>dev</env> </properties> </profile> <profile> <id>test-profile</id> <activation> <property> <name>maven.profile.env</name> <value>test</value> </property> </activation> <properties> <env>test</env> </properties> </profile> <profile> <id>prd-profile</id> <activation> <property> <name>maven.profile.env</name> <value>prd</value> </property> </activation> <properties> <env>prd</env> </properties> </profile> </profiles> <build> <plugins> <plugin> <groupId>org.springframework.boot</groupId> <artifactId>spring-boot-maven-plugin</artifactId> </plugin> </plugins> <!--定制打包时的资源拷贝--> <resources> <resource> <directory>src/main/resources</directory> <targetPath>./</targetPath> <includes> <include>application.properties</include> <include>application-${env}.properties</include> </includes> </resource> </resources> </build> </project>
然后在mvn打包时设置maven.profile.env的值, 如:
mvn clean package -Dmaven.skip.test=true -Dmaven.profile.env=prd
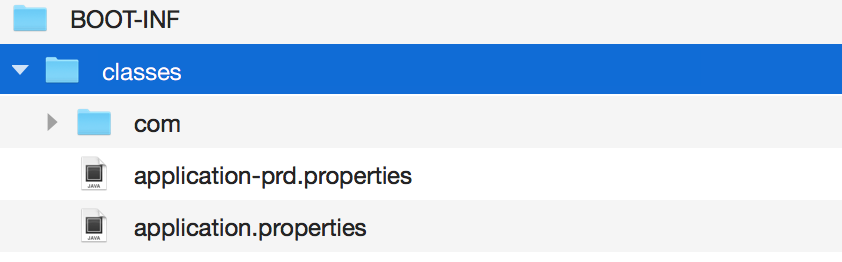
则最终的打进jar包里的配置文件就是这样的: