1、什么是WebSocket
WebSocket协议是基于TCP的一种网络协议。它实现了浏览器与服务器全双工(full-duplex)通信——允许服务器主动发送信息给客户端。
在没有WebSocket的时间里,我的实现web页面都是http,单向的请求-应答模式,但为了web页面具有良好的交互及实时性,采用了Long Polling等技术,但是会浪费不必要的资源,WebSocket的出现提供了一种更好的解决方案,WebSocket是HTML5定义的一种协议,这种协议可以实现client与server间全双工、双向的通信。
WebSocket协议被设计来取代用HTTP作为传输层的双向通讯技术,基于大部分Web服务都是HTTP协议,WebSocket仍使用HTTP来作为初始的握手(handshake),在握手中对HTTP协议进行升级,当服务端收到这个HTTP的协议升级请求后,如果支持WebSocket协议则返回HTTP状态码101,这样,WebSocket的握手便成功了
关于WebSocket的详细了解,请移步百度知乎。
2、Stomp 和 WebSocket
WebSocket协议定义了两种类型的消息,文本和二进制,但是它们的内容没有定义。因此为了定义客户端和服务器的协商机制,即: 一个更高级别的消息传递协议,WebSocket保留并提供了子协议字段,来让客户端和服务器在通信上定义的消息内容达成一致。
STOMP即Simple (or Streaming) Text Orientated Messaging Protocol,简单(流)文本定向消息协议,一个非常简单和容易实现的协议,提供了可互操作的连接格式,易于开发并应用广泛。
STOMP是以HTTP协议的为模型定制的,其结构:
COMMAND header1:value1 header2:value2 Body(Str) ---------------------------------- eg: SEND destination: /hello {\"name\": \"hardy\", \"age\":123 } 注: header和body有个空行
3、Spring与STOMP
spring-messaging模块已经支持了STOMP,官方也提供了详细文档,下面是官方提供的处理流图:
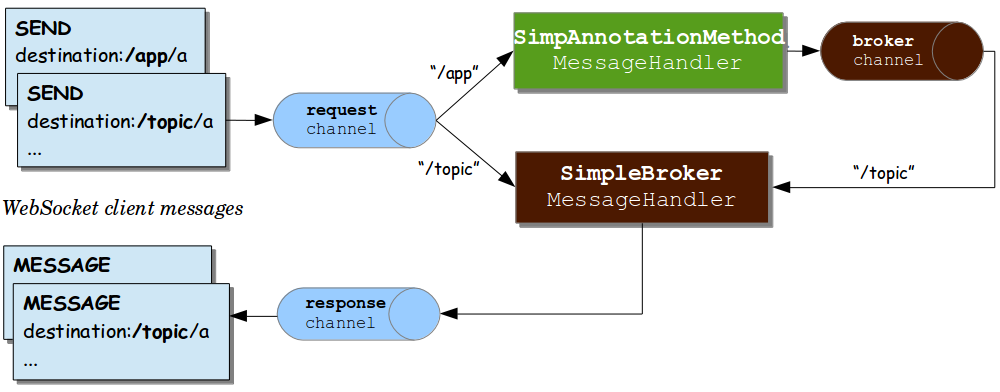
一些概念关键词:
- Message:消息,里面带有header和payload。
- MessageHandler:处理client消息的实体。
- MessageChannel:解耦消息发送者与消息接收者的实体
- clientInboundChannel:用于从WebSocket客户端接收消息。
- clientOutboundChannel:用于将服务器消息发送给WebSocket客户端。
- brokerChannel:用于从服务器端、应用程序中向消息代理发送消息
- Broker:存放消息的中间件,client可以订阅broker中的消息。
4、websocket 注解介绍
1. @MessageMapping
@MessageMapping,用户处理client发送过来的消息,被注解的方法可以具有以下参数。
- Message:用于接收完整的消息
- MessageHeaders:用于接收消息中的头信息
- MessageHeaderAccessor/SimpMessageHeaderAccessor/StompHeaderAccessor:用于接收消息中的头信息,并且构建绑定Spring中的一些附加信息
- @Headers:用于接收消息中的所有header。这个参数必须用java.util.Map
- @Header:用于接收特定的头值
- @Payload:接受STOMP协议中的Body,可以用@javax.validation进行注释, Spring的@Validated自动验证 (类似@RequestBody)
- DestinationVariable: 用于提取header中destination模板变量 (类似@PathVariable)
- java.security.Principal:接收在WebSocket HTTP握手时登录的用户
当@MessageMapping方法返回一个值时,默认情况下,该值在被序列化为Payload后,作为消息发送到向订阅者广播的“brokerChannel”,且消息destination与接收destination相同,但前缀为变为配置的值。
可以使用@SendTo指定发送的destination,将Payload消息,进行广播发送到订阅的客户端。@SendToUser是会向与当条消息关联的用户发送回执消息,还可以使用SimpMessagingTemplate发送代替SendTo/@SendToUserji进行消息的发送
2. @SubscribeMapping
@SubscribeMapping注释与@MessageMapping结合使用,以缩小到订阅消息的映射。在这种情况下,@MessageMapping注释指定目标,而@SubscribeMapping仅表示对订阅消息的兴趣。
@SubscribeMapping通常与@MessageMapping没有区别。关键区别在于,@SubscribeMapping的方法的返回值被序列化后,会发送到“clientOutboundChannel”,而不是“brokerChannel”,直接回复到客户端,而不是通过代理进行广播。这对于实现一次性的、请求-应答消息交换非常有用,并且从不占用订阅。这种模式的常见场景是当数据必须加载和呈现时应用程序初始化。
@SendTo注释@SubscribeMapping方法,在这种情况下,返回值被发送到带有显式指定目标目的地的“brokerChannel”。
3. @MessageExceptionHandler
应用程序可以使用@MessageExceptionHandler方法来处理@MessageMapping方法中的异常。 @MessageExceptionHandler方法支持灵活的方法签名,并支持与@MessageMapping方法相同的方法参数类型和返回值。与Spring MVC中的@ExceptionHandler类似。
@Controller public abstract class BaseController { @MessageExceptionHandler(MyException.class) public xxx handleException(MyException exception) { // ... return Xxx; } } public class WsController extends BaseController { // ... }
5、coding
demo环境准备:
直接 spring initializr 构建基础spring-boot项目,修改pom.xml:
<groupId>spring-boot-ws</groupId> <artifactId>spring-boot-ws</artifactId> <version>1.0.0</version> <parent> <groupId>org.springframework.boot</groupId> <artifactId>spring-boot-starter-parent</artifactId> <version>2.0.1.RELEASE</version> </parent> <properties> <java.version>1.8</java.version> <maven.compiler.encoding>UTF-8</maven.compiler.encoding> <project.build.sourceEncoding>UTF-8</project.build.sourceEncoding> </properties> <dependencies> <!-- spring boot core 配置 --> <dependency> <groupId>org.springframework.boot</groupId> <artifactId>spring-boot-starter-websocket</artifactId> </dependency> <!-- lombok annotation --> <dependency> <groupId>org.projectlombok</groupId> <artifactId>lombok</artifactId> <version>1.16.4</version> </dependency> <!-- tool --> <dependency> <groupId>commons-collections</groupId> <artifactId>commons-collections</artifactId> <version>3.2.1</version> </dependency> <dependency> <groupId>org.apache.commons</groupId> <artifactId>commons-lang3</artifactId> <version>3.3.2</version> </dependency> </dependencies>
配置Stomp WebSocket服务:
@Configuration @EnableWebSocketMessageBroker // 开启Stomp WebSocket服务 public class WebSocketConfig implements WebSocketMessageBrokerConfigurer { @Override public void registerStompEndpoints(StompEndpointRegistry registry) { registry.addEndpoint("/ws").setAllowedOrigins("*").withSockJS(); } @Override public void configureMessageBroker(MessageBrokerRegistry registry) { // 设置接收客户端消息 的 路径前缀(不设置可以) registry.setApplicationDestinationPrefixes("/app"); // 设置接收客户端订阅 的 路径前缀(必须不设置,可以为空串) registry.enableSimpleBroker("topic"); } @Override public void configureClientInboundChannel(ChannelRegistration registration) { // 添加拦截器,处理客户端发来的请求 registration.interceptors(new WebSocketHandleInterceptor()); } }
withSockJS:WebSocket存在一个问题,目前相当一部分低版本浏览器不支持WebSocket协议,或一些代理也可能会禁止HTTP的协议升级,从而阻碍WebSocket的握手与使用。所以这里Spring已经帮我们引入了SockJS,我只需要使用它,就可以和前端Sock.js联合使用
启用SockJs:
url结构:http://host:port/{endpoint}/{server-id}/{session-id}/{transport}
也可以: ws://host:port/{endpoint}/{transport}
eg: ws://127.0.0.1:8080/ws/websocket
不启用SockJS:
eg: ws://127.0.0.1:8080/ws
消息处理 controller:
@Controller public class MessageController { private static final Logger log = LoggerFactory.getLogger(MessageController.class); @Autowired private SimpMessagingTemplate simpMessagingTemplate; @MessageMapping("/test/{id}") public void test(Message message, MessageHeaders MessageHeaders, @Header("destination") String destination, @Headers Map<String, Object> headers, @DestinationVariable long id, @Payload String body) { log.info("[test] Message: {}", message); log.info("[test] MessageHeaders: {}", MessageHeaders); log.info("[test] Header: {}", destination); log.info("[test] Headers: {}", headers); log.info("[test] DestinationVariable: {}", id); log.info("[test] Payload: {}", body); } // ---------------------- 广播推送 ---------------------- @MessageMapping("/hello") public void hello(@Payload String body) { print(body); simpMessagingTemplate.convertAndSend("/sub/public", "reply hello"); } @MessageMapping("/hello1") @SendTo("/sub/public") public String hello1(@Payload String body) { print(body); return "reply hello1"; } @MessageMapping("/hello2") public void hello2(@Payload String body) { print(body); simpMessagingTemplate.convertAndSend("/aa/msg", "reply hello2"); } // ---------------------- 对点推送 ---------------------- @MessageMapping("/hello3") public void hello3(@Payload String body, Principal principal) { print(body); print(principal); simpMessagingTemplate.convertAndSendToUser(principal.getName(), "/sub/msg", "reply hello3"); } @MessageMapping("/hello4") @SendToUser("/sub/msg") public String hello4(@Payload String body) { print(body); return "reply hello4"; } private void print(Object data) { log.info("receive message body: {}", data); } }
项目已经可以启动了,但我们一般需要关心 client connected 和 disConnect,加入两个事件监听:
@Component public class WebSocketEventListener { private static final Logger log = LoggerFactory.getLogger(WebSocketEventListener.class); @EventListener public void handleConnectListener(SessionConnectedEvent event) { log.info("[ws-connected] socket connect: {}", event.getMessage()); // do someting ... } @EventListener public void handleDisconnectListener(SessionDisconnectEvent event) { log.info("[ws-disconnect] socket disconnect: {}", event.getMessage()); // do someting ... } }
WebSocketConfig.class 中注册了一个接受客户端消息通道拦截器:
public void configureClientInboundChannel(ChannelRegistration registration) { registration.interceptors(new WebSocketHandleInterceptor()); }
实现这个拦截器,主是为了绑定user到websocket conn上:
public class WebSocketHandleInterceptor extends ChannelInterceptorAdapter { @Override public Message<?> preSend(Message<?> message, MessageChannel channel) { StompHeaderAccessor accessor = MessageHeaderAccessor.getAccessor(message, StompHeaderAccessor.class); if (StompCommand.CONNECT.equals(accessor.getCommand())) { String username = accessor.getFirstNativeHeader("username"); if (StringUtils.isEmpty(username)) return null; // 绑定user Principal principal = new UserPrincipal(username); accessor.setUser(principal); } return message; } }
如果连接消息中没有我们想要的 username 将连接不上,到这我们的服务基本完成了,我们还需要一个简单的client
<!DOCTYPE html> <html lang="en"> <head> <meta charset="UTF-8"> <title>Stomp Demo Test</title> <link rel="stylesheet" href="css/main.css"/> <script src="https://cdn.bootcss.com/stomp.js/2.3.3/stomp.js"></script> <script> var username = '54F05DAA-4BBD-496E-B8B0-288A8337F4B9'; var sendMessage = null; var disConnect = null; function connect() { var client = Stomp.client('ws://127.0.0.1:8080/ws/websocket'); client.heartbeat.outgoing = 5000; client.heartbeat.incoming = 0; client.connect({ username: username }, function (succ) { console.log('client connect success:', succ); updateState('连接成功'); // 订阅广播 client.subscribe("/sub/public", onMessage); // 订阅消息 client.subscribe("/user/sub/msg", onMessage); }, function (error) { console.log('client connect error:', error); updateState('连接失败'); }); sendMessage = function (destination, headers, body) { client.send(destination, headers, body) }; disConnect = function () { client.disconnect(); console.log('client connect break') } } function onMessage(message) { console.log(message); insertChat(false, message.destination, message.body) } function send() { var destination = document.getElementById("destination").value; var body = document.getElementById("content").value; if (sendMessage == null) { alert('ws connect break'); return; } sendMessage(destination, {}, body); insertChat(true, destination, body) } function updateState(state) { document.getElementById("state").innerHTML = state; } function insertChat(isLeft, destination, body) { var p = document.createElement('p'); if (isLeft) { p.setAttribute('class', 'p-left'); } else { p.setAttribute('class', 'p-right'); } p.innerHTML = destination + '<br/>' + body; document.getElementById("chat").appendChild(p); } </script> </head> <body> <div class="body-left"> <div id="state">未连接</div> <button id="connect" onclick="connect()">连接</button> <button id="disConnect" onclick="disConnect()">断开</button> <div> <input id="destination" type="text"/> <textarea id="content" rows="10"></textarea> <button id="send" onclick="send()">发送</button> </div> <div> </div> </div> <div id="chat" class="body-right"> <p class="p-left">client message ...</p> <p class="p-right">server message ...</p> </div> </body> </html>
这个html没有应用sock.js只用了stomp.js,也可以这样:
var socket=new SockJS("http://127.0.0.1:8080/ws"); var client = Stomp.over(socket);
启动服务:
./run.sh
简陋的测试页面 ~.~
到这里我们的服务已经比较完整,可以进行交互发送回复,有一个问题我一直没有找到答案,通过官方文档,我并没有找到 server 怎么主动断开 client connection,头疼...,推荐一下官方文档,需要仔细阅读
源代码
参考资料
撒花 ~~

