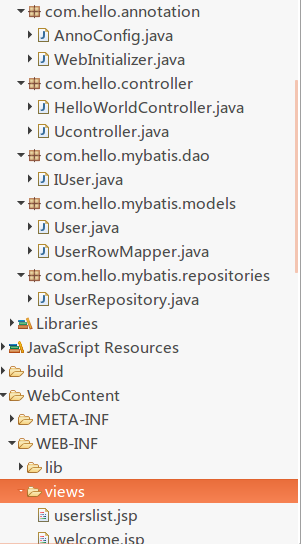
项目结构
一、新建动态web项目取名HelloSpringMVC
二、/WebContent/WEB-INF/lib下导入必要依赖库
commons-collections4-4.1.jar、commons-dbcp2-2.1.1.jar、commons-logging-1.2.jar
commons-pool2-2.4.3.jar、jstl-1.2.jar、mybatis-3.4.5.jar、mybatis-spring-1.3.1.jar
mysql-connector-java-5.1.44-bin.jar、spring-aop-4.3.12.RELEASE.jar
spring-aspects-4.3.12.RELEASE.jar、spring-beans-4.3.12.RELEASE.jar
spring-context-4.3.12.RELEASE.jar、spring-context-support-4.3.12.RELEASE.jar
spring-core-4.3.12.RELEASE.jar、spring-expression-4.3.12.RELEASE.jar
spring-instrument-4.3.12.RELEASE.jar、spring-instrument-tomcat-4.3.12.RELEASE.jar
spring-jdbc-4.3.12.RELEASE.jar、spring-jms-4.3.12.RELEASE.jar
spring-messaging-4.3.12.RELEASE.jar、spring-orm-4.3.12.RELEASE.jar
spring-oxm-4.3.12.RELEASE.jar、spring-test-4.3.12.RELEASE.jar、spring-tx-4.3.12.RELEASE.jar
spring-web-4.3.12.RELEASE.jar、spring-webmvc-4.3.12.RELEASE.jar
spring-webmvc-portlet-4.3.12.RELEASE.jar、spring-websocket-4.3.12.RELEASE.jar
三、WebInitializer(相当于web.xml)
package com.hello.annotation; import javax.servlet.ServletContext; import javax.servlet.ServletException; import javax.servlet.ServletRegistration; import org.springframework.web.WebApplicationInitializer; import org.springframework.web.context.support.AnnotationConfigWebApplicationContext; import org.springframework.web.servlet.DispatcherServlet; public class WebInitializer implements WebApplicationInitializer { @Override public void onStartup(ServletContext servletContext) throws ServletException { // TODO 自动生成的方法存根 AnnotationConfigWebApplicationContext ctx = new AnnotationConfigWebApplicationContext(); ctx.register(AnnoConfig.class); ctx.setServletContext(servletContext);//新建WebApplicationContext,注册配置类,并将其和当前的servletContext关联 //ctx.setConfigLocation("/WEB-INF/spring/dispatcher-config.xml"); //注册sprigmvc的DispatcherServlet ServletRegistration.Dynamic servlet = servletContext.addServlet("dispatcher",new DispatcherServlet(ctx)); servlet.addMapping("/"); servlet.setLoadOnStartup(1); } }
四、AnnoConfig(相当于application.xml)这里把数据源也配置了
package com.hello.annotation; import javax.sql.DataSource; import org.apache.commons.dbcp2.BasicDataSource; import org.springframework.beans.factory.annotation.Qualifier; import org.springframework.context.annotation.Bean; import org.springframework.context.annotation.ComponentScan; import org.springframework.context.annotation.Configuration; import org.springframework.jdbc.core.JdbcTemplate; import org.springframework.web.servlet.ViewResolver; import org.springframework.web.servlet.config.annotation.EnableWebMvc; import org.springframework.web.servlet.view.InternalResourceViewResolver; import org.springframework.web.servlet.view.JstlView; @Configuration @EnableWebMvc @ComponentScan("com.hello.*") public class AnnoConfig { @Bean public ViewResolver viewResolver() { InternalResourceViewResolver viewResolver = new InternalResourceViewResolver(); viewResolver.setViewClass(JstlView.class); viewResolver.setPrefix("/WEB-INF/views/"); viewResolver.setSuffix(".jsp"); return viewResolver; } @Bean(name = "primaryDataSource") public BasicDataSource dataSource() { BasicDataSource ds = new BasicDataSource(); ds.setDriverClassName("com.mysql.jdbc.Driver"); ds.setUrl("jdbc:mysql://localhost:3306/test2?useSSL=false"); ds.setUsername("your-user"); ds.setPassword("your-passwd"); return ds; } @Bean(name = "primaryJdbcTemplate") public JdbcTemplate primaryJdbcTemplate( @Qualifier("primaryDataSource") DataSource dataSource) { return new JdbcTemplate(dataSource); } }
五、控制类
package com.hello.controller; import javax.servlet.http.HttpSession; import org.springframework.stereotype.Controller; import org.springframework.ui.ModelMap; import org.springframework.web.bind.annotation.RequestMapping; @Controller public class HelloWorldController { @RequestMapping("/") public String sayHello(ModelMap model) { model.addAttribute("greeting", "你好! Spring 4 MVC"); return "welcome"; } @RequestMapping("/login") public String login(HttpSession session, String username, String password) throws Exception { // 调用 service 层验证登录 // ... // 模拟登录成功 session.setAttribute("username", username); return "redirect:/u/list"; } }
六、视图welcome.jsp(放在WEB-INF/views/下)
<?xml version="1.0" encoding="UTF-8" ?> <!DOCTYPE html PUBLIC "-//W3C//DTD XHTML 1.0 Transitional//EN" "http://www.w3.org/TR/xhtml1/DTD/xhtml1-transitional.dtd"> <html xmlns="http://www.w3.org/1999/xhtml"> <head> <%@ page language="java" contentType="text/html; charset=UTF-8" pageEncoding="UTF-8"%> <meta http-equiv="Content-Type" content="text/html; charset=UTF-8" /> <title>在此处插入标题</title> </head> <body> Greeting : ${greeting} </body> </html>
七、运行

八、JdbcTemplate访问数据库部分
IUser、User、UserRowMapper、UserRepository等类和接口完全参照SpringBoot的dao层、JdbcTemplate多数据源访问实例。这里只把包com.yiibai改为com.hello。
增加控制类Ucontroller也是参考SpringBoot的dao层、JdbcTemplate多数据源访问实例。但修改较大(用了ModelAndView),具体内容如下:
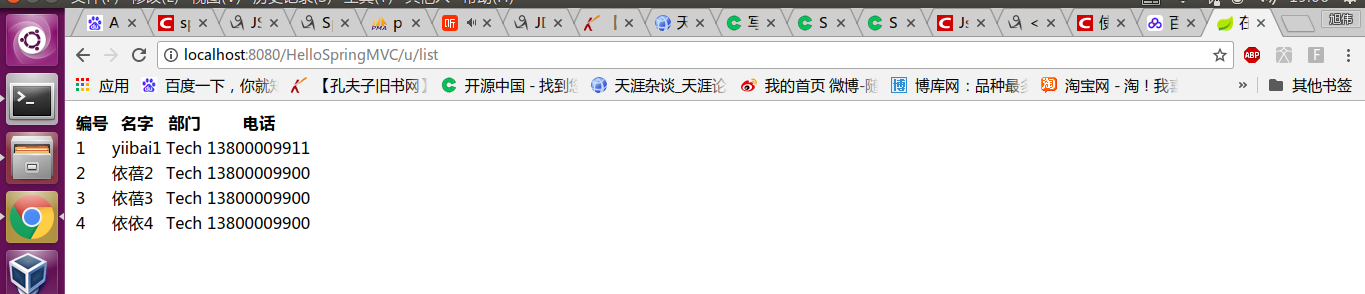
package com.hello.controller; import java.util.List; import org.springframework.beans.factory.annotation.Autowired; import org.springframework.beans.factory.annotation.Qualifier; import org.springframework.jdbc.core.JdbcTemplate; import org.springframework.stereotype.Controller; import org.springframework.web.bind.annotation.PathVariable; import org.springframework.web.bind.annotation.RequestMapping; import org.springframework.web.bind.annotation.RequestMethod; import org.springframework.web.servlet.ModelAndView; import com.hello.mybatis.models.User; import com.hello.mybatis.repositories.UserRepository; @Controller @RequestMapping("/u") public class Ucontroller { @Autowired @Qualifier("primaryJdbcTemplate") protected JdbcTemplate primaryJdbcTemplate; @Autowired private UserRepository userRepository; @RequestMapping(value = "/list", method = {RequestMethod.POST, RequestMethod.GET}) public ModelAndView getUsers() { List<User> ulist=userRepository.findAll(); ModelAndView modelAndView = new ModelAndView("userslist");//转到/WEB-INF/views/userslist.jsp //modelAndView.setViewName("userslist"); modelAndView.addObject("userslist", ulist); return modelAndView; } }
这里要注意应该引入的是: org.springframework.web.servlet.ModelAndView;
而不是 org.springframework.web.portlet.ModelAndView,否则会出错。
视图userslist.jsp(也在WEB-INF/views/下)
<?xml version="1.0" encoding="UTF-8" ?> <!DOCTYPE html PUBLIC "-//W3C//DTD XHTML 1.0 Transitional//EN" "http://www.w3.org/TR/xhtml1/DTD/xhtml1-transitional.dtd"> <html xmlns="http://www.w3.org/1999/xhtml"> <head> <%@ page language="java" contentType="text/html; charset=UTF-8" pageEncoding="UTF-8"%> <meta http-equiv="Content-Type" content="text/html; charset=UTF-8" /> <%@ taglib uri="http://java.sun.com/jsp/jstl/core" prefix="c"%> <title>在此处插入标题</title> </head> <body> <table> <tr> <th>编号</th> <th>名字</th> <th>部门</th> <th>电话</th> </tr> <c:forEach items="${userslist}" var="users"> <tr> <td>${users.id}</td> <td>${users.name}</td> <td>${users.dept}</td> <td>${users.phone}</td> </tr> </c:forEach> </table> </body> </html>
运行:
http://localhost:8080/HelloSpringMVC/login
HelloWorldController中"/login"重定向到"/u/list",然后调用Ucontroller类中public ModelAndView getUsers()。
项目代码点击:下载
参考:

