在Docker环境成功搭建了Apache Hadoop 2.8 分布式集群,并实现了NameNode HA、ResourceManager HA之后(详见我的另一篇博文:Apache Hadoop 2.8分布式集群详细搭建过程),接下来将搭建最新稳定版的Apache Hive 2.1.1,方便日常在自己电脑上测试hive配置和作业,同样的配置也可以应用于服务器上。以下是Apache Hive 2.1.1的安装配置详细过程
1、阅读Apache Hive官网说明文档,下载最新版本Hive
Hive是一个基于Hadoop的数据仓库工具,将HDFS中的结构化数据映射为数据表,并实现将类SQL脚本转换为MapReduce作业,从而实现用户只需像传统关系型数据库提供SQL语句,并能实现对Hadoop数据的分析和处理,门槛低,非常适合传统的基于关系型数据库的数据分析向基于Hadoop的分析进行转变。因此,Hive是Hadoop生态圈非常重要的一个工具。
安装配置Apache Hive,最直接的方式,便是阅读 Apache Hive官网的说明文档,能了解到很多有用的信息。Apache Hive 要求JDK 1.7及以上,Hadoop 2.x(从Hive 2.0.0开始便不再支持Hadoop 1.x),Hive 可部署于Linux、Mac、Windows环境。
从官网下载最新稳定版本的 Apache Hive 2.1.1
2、安装配置Apache Hive
(1)解压 hive 压缩包
tar -zxvf apache-hive-2.1.1-bin.tar.gz
(2)配置环境变量
vi ~/.bash_profile # 配置hive环境 export HIVE_HOME=/home/ahadoop/apache-hive-2.1.1-bin export HIVE_CONF_DIR=$HIVE_HOME/conf export PATH=$PATH:$HIVE_HOME/bin # 使配置文件生效 source ~/.bash_profile
(3)配置hive-site.xml
官网给出了Apache Hive的配置说明,Hive的配置支持多种方式,主要如下(以map-reduce临时目录配置项 hive.exec.scratchdir 为例):
set hive.exec.scratchdir=/tmp/mydir;
- 第2种,hive 交互命令的参数(--hiveconf)
bin/hive --hiveconf hive.exec.scratchdir=/tmp/mydir
<property> <name>hive.exec.scratchdir</name> <value>/tmp/mydir</value> <description>Scratch space for Hive jobs</description> </property>
- 第4种,hivemetastore-site.xml, hiveserver2-site.xml 配置文件
<property> <name>hive.exec.scratchdir</name> <value>/tmp/mydir</value> <description>Scratch space for Hive jobs</description> </property>
当同时出现多种配置方式时,则按以下优先级生效(越往后,优先级越高):
hive-site.xml -> hivemetastore-site.xml -> hiveserver2-site.xml -> '--hiveconf' 命令行参数
在 $HIVE_HOME/conf 里面还有一个默认的配置文件 hive-default.xml.template ,这里存储了默认的参数,通过复制该默认配置模板,并命名为hive-site.xml,用于配置新的参数
cp $HIVE_HOME/conf/hive-default.xml.template $HIVE_HOME/conf/hive-site.xml
在配置hive-site.xml之前,要先做一些准备工作
首先,在HDFS上新建文件夹
a、临时文件夹,默认map-reduce临时的中转路径是hdfs上的/tmp/hive-<username>,因此,如果hdfs上没有/tmp临时文件夹,则新建并授权
hadoop fs -mkdir /tmp hadoop fs -chmod g+w /tmp
b、创建hive数据仓库目录,默认是存放在hdfs上的/user/hive/warehouse目录,新建并授权
hadoop fs -mkdir /user/hive hadoop fs -mkdir /user/hive/warehouse hadoop fs -chmod g+w /user/hive hadoop fs -chmod g+w /user/hive/warehouse
其次,安装mysql用于存储hive的元数据
hive 默认使用Derby作为Hive metastore的存储数据库,这个数据库更多用于单元测试,只支持一个用户访问,在生产环境,建议改成功能更强大的关系型数据库,根据官网的介绍,支持用于存储hive元数据的数据库如下:
| hive元数据支持的数据库 | 最低版本要求 |
| MySQL | 5.6.17 |
| Postgres | 9.1.13 |
| Oracle | 11g |
| MS SQL Server | 2008 R2 |
由于元数据的数据量都比较小,一般都以安装mysql来存储元数据。下面将介绍mysql的安装配置
a、到MySQL官网打开MySQL 社区版下载页面,然后下载以下的MySQL rpm安装包
b、MySQL官网有介绍MySQL rpm包的安装方法,一般需要安装 mysql-community-server, mysql-community-client, mysql-community-libs, mysql-community-common, and mysql-community-libs-compat 这些包。在MySQL服务端至少安装 mysql-community-{server,client,common,libs}-* 软件 包,在MySQL客户端至少安装 mysql-community-{client,common,libs}-* 软件包
在安装之前,先查看一下,系统之前是否有安装过mysql相关的包,如果有,则卸载掉,输入指令查询
rpm -qa|grep mysql
在本实验中,由于在docker里面的centos6安装,由于是centos6精简环境,还需要安装一些相应的依赖包,如下
yum install -y perl libaio numactl.x86_64
接下来,按顺序安装mysql 的 rpm包,由于这几个rpm包有依赖关系,因此,安装时按以下顺序逐个安装
rpm -ivh mysql-community-common-5.7.18-1.el6.x86_64.rpm rpm -ivh mysql-community-libs-5.7.18-1.el6.x86_64.rpm rpm -ivh mysql-community-libs-compat-5.7.18-1.el6.x86_64.rpm rpm -ivh mysql-community-client-5.7.18-1.el6.x86_64.rpm rpm -ivh mysql-community-devel-5.7.18-1.el6.x86_64.rpm rpm -ivh mysql-community-server-5.7.18-1.el6.x86_64.rpm
c、全部安装完成后,则使用 service mysqld start 启动mysql服务,首次启动时,mysql 数据库还会进行初始化,并生成root的初始密码
[root@31d48048cb1e ahadoop]# service mysqld start Initializing MySQL database: [ OK ] Installing validate password plugin: [ OK ] Starting mysqld: [ OK ]
d、在日志里面获取root初始密码,使用以下命令
[root@31d48048cb1e ahadoop]# grep 'temporary password' /var/log/mysqld.log 2017-06-23T04:04:40.322567Z 1 [Note] A temporary password is generated for root@localhost: g1hK=pYBo(x9
其中,最后的 g1hK=pYBo(x9 就是初始密码(随机产生的,每次安装不一样的哦)
使用初始密码,登录mysql并修改root密码为 Test.123
mysql -u root -p mysql> ALTER USER 'root'@'localhost' IDENTIFIED BY 'Test.123';
【注意】MySQL 默认会开启强密码验证(MySQL's validate_password plugin is installed by default),要求密码长度至少8个字符,包含至少1个大写、1个小写、1个数字、1个特殊字符。
e、修改数据库的字符集,查看默认的字符集
mysql> SHOW VARIABLES like 'character%'; +--------------------------+----------------------------+ | Variable_name | Value | +--------------------------+----------------------------+ | character_set_client | utf8 | | character_set_connection | utf8 | | character_set_database | latin1 | | character_set_filesystem | binary | | character_set_results | utf8 | | character_set_server | latin1 | | character_set_system | utf8 | | character_sets_dir | /usr/share/mysql/charsets/ | +--------------------------+----------------------------+ 8 rows in set (0.00 sec)
可以看出,database、server的字符集为latin1,如果后面在建数据库、数据表时,没有指定utf8,输入中文会变成乱码。MySQL 官网有介绍了更改字符集的方法,修改 mysql 的配置文件
vi /etc/my.cnf # 在 [mysqld] 下面加上这个配置 [mysqld] character-set-server=utf8 # 如果 client 默认不是 utf8,要改成 utf8 则在 [client] 中加上这个配置 [client] default-character-set=utf8
更改好配置文件后,保存退出,重启 mysql
service mysqld restart
再查看数据库的字符集,已变成utf8,如下
mysql> SHOW VARIABLES like 'character%'; +--------------------------+----------------------------+ | Variable_name | Value | +--------------------------+----------------------------+ | character_set_client | utf8 | | character_set_connection | utf8 | | character_set_database | utf8 | | character_set_filesystem | binary | | character_set_results | utf8 | | character_set_server | utf8 | | character_set_system | utf8 | | character_sets_dir | /usr/share/mysql/charsets/ | +--------------------------+----------------------------+ 8 rows in set (0.00 sec)
f、创建用于存储hive元数据库的数据库、账号密码
使用mysql的root账号进入mysql后,创建数据库 hivedb,账号 hive,密码 Test.123
create database hivedb; GRANT ALL ON hivedb.* TO 'hive'@'localhost' IDENTIFIED BY 'Test.123'; flush privileges;
到此,存储hive元数据的mysql已经搭建完成。
接下来,将继续配置hive-site.xml,使用mysql进行存储,hive官网有说明文档
# 复制 hive 的默认配置模板文件为 hive-site.xml cp $HIVE_HOME/conf/hive-default.xml.template $HIVE_HOME/conf/hive-site.xml # 复制 mysql 驱动包到 lib 目录 mv mysql-connector-java-6.0.6-bin.jar $HIVE_HOME/lib/
编辑hive_site.xml,修改jdbc链接(hd1为mysql server的主机名)、驱动、账号、密码、数据仓库默认路径(hdfs)等信息,如下:
<property> <name>javax.jdo.option.ConnectionURL</name> <value>jdbc:mysql://hd1:3306/hivedb?createDatabaseIfNotExist=true</value> <description> JDBC connect string for a JDBC metastore. To use SSL to encrypt/authenticate the connection, provide database-specific SSL flag in the connection URL. For example, jdbc:postgresql://myhost/db?ssl=true for postgres database. </description> </property> <property> <name>javax.jdo.option.ConnectionDriverName</name> <value>com.mysql.jdbc.Driver</value> <description>Driver class name for a JDBC metastore</description> </property> <property> <name>javax.jdo.option.ConnectionUserName</name> <value>hive</value> <description>Username to use against metastore database</description> </property> <property> <name>javax.jdo.option.ConnectionPassword</name> <value>Test.123</value> <description>password to use against metastore database</description> </property> <property> <name>hive.metastore.warehouse.dir</name> <value>/user/hive/warehouse</value> <description>location of default database for the warehouse</description> </property>
在完成基本配置后,还有以下几点需要注意的
a、按官网文档,还强烈推荐在hive-site.xml中配置datanucleus.autoStartMechanism项,以解决多并发读取失败的问题(HIVE-4762),配置如下
<property> <name>datanucleus.autoStartMechanism</name> <value>SchemaTable</value> </property>
b、在hive-site.xml中再配置元数据认证为false,否则启动时会报以下异常
Caused by: MetaException(message:Version information not found in metastore. )
配置如下
<property> <name>hive.metastore.schema.verification</name> <value>false</value> <description> Enforce metastore schema version consistency. True: Verify that version information stored in metastore matches with one from Hive jars. Also disable automatic schema migration attempt. Users are required to manully migrate schema after Hive upgrade which ensures proper metastore schema migration. (Default) False: Warn if the version information stored in metastore doesn't match with one from in Hive jars. </description> </property>
当配置为true时,则表示会强制metastore的版本信息与hive jar 一致。(这里很奇怪,使用hive官网下载的包来解压安装,按理metastore的版本信息应该是会和hive jar一致的,怎么设置为true会报异常呢)
c、配置 io 临时目录,否则会报异常
Exception in thread "main" java.lang.IllegalArgumentException: java.net.URISyntaxException: Relative path in absolute URI: ${system:java.io.tmpdir%7D/$%7Bsystem:user.name%7D at org.apache.hadoop.fs.Path.initialize(Path.java:254) at org.apache.hadoop.fs.Path.<init>(Path.java:212) at org.apache.hadoop.hive.ql.session.SessionState.createSessionDirs(SessionState.java:644) at org.apache.hadoop.hive.ql.session.SessionState.start(SessionState.java:563) at org.apache.hadoop.hive.ql.session.SessionState.beginStart(SessionState.java:531) at org.apache.hadoop.hive.cli.CliDriver.run(CliDriver.java:705) at org.apache.hadoop.hive.cli.CliDriver.main(CliDriver.java:641) at sun.reflect.NativeMethodAccessorImpl.invoke0(Native Method) at sun.reflect.NativeMethodAccessorImpl.invoke(NativeMethodAccessorImpl.java:62) at sun.reflect.DelegatingMethodAccessorImpl.invoke(DelegatingMethodAccessorImpl.java:43) at java.lang.reflect.Method.invoke(Method.java:498) at org.apache.hadoop.util.RunJar.run(RunJar.java:234) at org.apache.hadoop.util.RunJar.main(RunJar.java:148) Caused by: java.net.URISyntaxException: Relative path in absolute URI: ${system:java.io.tmpdir%7D/$%7Bsystem:user.name%7D at java.net.URI.checkPath(URI.java:1823) at java.net.URI.<init>(URI.java:745) at org.apache.hadoop.fs.Path.initialize(Path.java:251) ... 12 more
这是因为在hive-site.xml中使用了变量${system:java.io.tmpdir}为表示io临时目录,但没有指定这个变量的值,也即没有指定io临时目录的路径,因此会报异常。
创建io临时目录
mkdir /home/ahadoop/hive-data mkdir /home/ahadoop/hive-data/tmp
配置 hive-site.xml 指定 io 临时目录的路径(本实验使用的linux账号为ahadoop,可根据实际情况修改)
<property> <name>system:java.io.tmpdir</name> <value>/home/ahadoop/hive-data/tmp</value> </property> <property> <name>system:user.name</name> <value>ahadoop</value> </property>
经过以上步骤,已经完成了hive-site.xml的配置了
(4)初始化hive元数据库
执行以下指令初始化hive元数据库,否则 mysql 里面储存 hive 元数据的数据库是空的,无法启动 hive,会报错
schematool -dbType mysql -initSchema
(5)启动 hive
# 输入 hive ,启动 hive $ hive # 查看数据库 hive> show databases; OK default Time taken: 1.221 seconds, Fetched: 1 row(s) # 创建数据库 hive> create database testdb; OK Time taken: 0.362 seconds # 切换数据库 hive> use testdb; OK Time taken: 0.032 seconds # 创建数据表 hive> create table tmp_test(a int,b string) row format delimited fields terminated by '|'; OK Time taken: 0.485 seconds # 导入数据 hive> LOAD DATA LOCAL INPATH 'tmp_test' OVERWRITE INTO TABLE tmp_test; Loading data to table testdb.tmp_test OK Time taken: 2.926 seconds # 查询数据表 hive> select * from tmp_test; OK 1 fdsfds 2 dddd 3 4fdss Time taken: 1.376 seconds, Fetched: 3 row(s)
创建数据库、数据表、导入数据、查询数据等,都能正常执行,说明 hive 已经配置成功了
3、配置使用 beeline
beeline 是 hive 提供的一个新的命令行工具,基于SQLLine CLI的JDBC客户端,beeline 要与HiveServer2配合使用,支持嵌入模式和远程模式两种,也即既可以像hive client一样访问本机的hive服务,也可以通过指定ip和端口远程访问某个hive服务。hive 官网是推荐使用beeline,它还提供了更为友好的显示方式(类似mysql client)
a、要使用 beeline ,先把 hiveserver2 启动起来,默认端口为10000
# 启动 hiveserver2 $ hiveserver2
b、使用beeline
# 1、指定要连接的hiveserver2的主机、端口 beeline -u jdbc:hive2://hd1:10000 # 2、如果是本机的hiveserver2,则可省略主机、端口 beeline -u jdbc:hive2://
在连接时,beeline报异常
[ahadoop@31d48048cb1e ~]$ beeline -u jdbc:hive2://hd1:10000 which: no hbase in (/usr/local/sbin:/usr/local/bin:/usr/sbin:/usr/bin:/sbin:/bin:/home/ahadoop/bin:/usr/java/jdk1.8.0_131/bin:/home/ahadoop/hadoop-2.8.0/bin:/home/ahadoop/hadoop-2.8.0/sbin:/home/ahadoop/zookeeper-3.4.10/bin:/home/ahadoop/apache-hive-2.1.1-bin/bin) SLF4J: Class path contains multiple SLF4J bindings. SLF4J: Found binding in [jar:file:/home/ahadoop/apache-hive-2.1.1-bin/lib/log4j-slf4j-impl-2.4.1.jar!/org/slf4j/impl/StaticLoggerBinder.class] SLF4J: Found binding in [jar:file:/home/ahadoop/hadoop-2.8.0/share/hadoop/common/lib/slf4j-log4j12-1.7.10.jar!/org/slf4j/impl/StaticLoggerBinder.class] SLF4J: See http://www.slf4j.org/codes.html#multiple_bindings for an explanation. SLF4J: Actual binding is of type [org.apache.logging.slf4j.Log4jLoggerFactory] Connecting to jdbc:hive2://hd1:10000 17/06/23 10:35:14 [main]: WARN jdbc.HiveConnection: Failed to connect to hd1:10000 Error: Could not open client transport with JDBC Uri: jdbc:hive2://hd1:10000: Failed to open new session: java.lang.RuntimeException: org.apache.hadoop.ipc.RemoteException(org.apache.hadoop.security.authorize.AuthorizationException): User: ahadoop is not allowed to impersonate anonymous (state=08S01,code=0) Beeline version 2.1.1 by Apache Hive
显示是本机的linux用户ahadoop,不允许访问的异常 (org.apache.hadoop.security.authorize.AuthorizationException): User: ahadoop is not allowed to impersonate anonymous
这是由于hadoop 2.0以后引入了一个安全伪装机制,使得hadoop不允许上层系统(例如hive)直接将实际用户传递到hadoop层,而是将实际用户传递给一个超级代理,由该代理在hadoop上执行操作,避免任意客户端随意操作hadoop。因此,将本实验的linux用户ahadoop,设置为代理用户
在 $HADOOP_HOME/etc/hadoop/core-site.xml 中配置
<property> <name>hadoop.proxyuser.ahadoop.hosts</name> <value>*</value> <description>配置*,表示任意主机。也可以指定是某些主机(主机之间使用英文逗号隔开),如果有指定,则表示超级用户代理功能只支持指定的主机,在其它主机节点仍会报错</description> </property> <property> <name>hadoop.proxyuser.ahadoop.groups</name> <value>*</value> <description>配置*,表示任意组。也可以指定是某个组(组之间使用英文逗号隔开),如果有指定,则表示该组下面的用户可提升为超级用户代理</description> </property>
配置后,重启hadoop集群,或者使用以下命令,刷新配置
hdfs dfsadmin –refreshSuperUserGroupsConfiguration yarn rmadmin –refreshSuperUserGroupsConfiguration # 针对 namenode HA 集群的,两个 namenode 都要刷新配置 hadoop dfsadmin -fs hdfs://hd1:8020 –refreshSuperUserGroupsConfiguration hadoop dfsadmin -fs hdfs://hd2:8020 –refreshSuperUserGroupsConfiguration
修改hadoop的core-site.xml配置后,再使用 beeline -u jdbc:hive2:// 重新连接,这时仍然报异常,如下
17/06/24 03:48:58 [main]: WARN Datastore.Schema: Exception thrown obtaining schema column information from datastore java.sql.SQLException: Column name pattern can not be NULL or empty. at com.mysql.cj.jdbc.exceptions.SQLError.createSQLException(SQLError.java:545) ~[mysql-connector-java-6.0.6-bin.jar:6.0.6] at com.mysql.cj.jdbc.exceptions.SQLError.createSQLException(SQLError.java:513) ~[mysql-connector-java-6.0.6-bin.jar:6.0.6] at com.mysql.cj.jdbc.exceptions.SQLError.createSQLException(SQLError.java:505) ~[mysql-connector-java-6.0.6-bin.jar:6.0.6] at com.mysql.cj.jdbc.exceptions.SQLError.createSQLException(SQLError.java:479) ~[mysql-connector-java-6.0.6-bin.jar:6.0.6] at com.mysql.cj.jdbc.DatabaseMetaData.getColumns(DatabaseMetaData.java:2074) ~[mysql-connector-java-6.0.6-bin.jar:6.0.6]
经查,原因是由于本实验使用的mysql jdbc驱动是比较高的版本(mysql-connector-java-6.0.6-bin.jar),将其替换为较低的版本(mysql-connector-java-5.1.30-bin.jar)
mv mysql-connector-java-5.1.30-bin.jar $HIVE_HOME/lib/ rm $HIVE_HOME/lib/mysql-connector-java-6.0.6-bin.jar
修改配置后,再次使用 beeline -u jdbc:hive2:// 重新连接,就正常了,可顺利进入到 beeline 了
[ahadoop@31d48048cb1e ~]$ beeline -u jdbc:hive2:// 0: jdbc:hive2://> show databases; OK +----------------+--+ | database_name | +----------------+--+ | default | | testdb | +----------------+--+ 2 rows selected (1.89 seconds) 0: jdbc:hive2://> use testdb; OK No rows affected (0.094 seconds) 0: jdbc:hive2://> show tables; OK +------------+--+ | tab_name | +------------+--+ | tmp_test | | tmp_test2 | +------------+--+ 2 rows selected (0.13 seconds) 0: jdbc:hive2://> desc tmp_test; OK +-----------+------------+----------+--+ | col_name | data_type | comment | +-----------+------------+----------+--+ | a | int | | | b | string | | +-----------+------------+----------+--+ 2 rows selected (0.308 seconds) 0: jdbc:hive2://>
可以看出,其显示方式与mysql client比较类似
使用完beeline后,使用 !quit 退出 beeline
到此,beeline 成功完成配置
4、配置使用 Hive Web Interface(hwi)
Hive Web Interface(hwi)是Hive自带的一个Web GUI,功能不多,可用于展示,查看数据表、执行hql脚本。官网有较为详细的介绍。
由于hive-bin包中并没有包含hwi的页面,只有Java代码编译好的jar包(hive-hwi-2.1.1.jar),因此,还需要下载hive源代码,从中提取jsp页面文件并打包成war文件,放到hive-lib目录中
(1)从apache hive中下载hive源代码压缩包:apache-hive-2.1.1-src.tar.gz
(2)解压并将hwi页面打包成war
# 解压源代码压缩包 tar -zxvf apache-hive-2.1.1-src.tar.gz # 切换到hwi目录 cd apache-hive-2.1.1-src/hwi # 将 web 目录下的 jsp 页面打包成 war 格式,输入文件格式为 hive-hwi-${version}.war jar cfM hive-hwi-2.1.1.war -C web .
(3)将war包复制到hive-lib目录
cp apache-hive-2.1.1-src/hwi/hive-hwi-2.1.1.war $HIVE_HOME/lib/
(4)启动 hwi
输入指令启动 hwi
hive --service hwi &
结果报异常,无法启动
[ahadoop@31d48048cb1e ~]$ hive --service hwi & [1] 3192 [ahadoop@31d48048cb1e ~]$ which: no hbase in (/usr/local/sbin:/usr/local/bin:/usr/sbin:/usr/bin:/sbin:/bin:/home/ahadoop/bin:/usr/java/jdk1.8.0_131/bin:/home/ahadoop/hadoop-2.8.0/bin:/home/ahadoop/hadoop-2.8.0/sbin:/home/ahadoop/zookeeper-3.4.10/bin:/home/ahadoop/apache-hive-2.1.1-bin/bin) SLF4J: Class path contains multiple SLF4J bindings. SLF4J: Found binding in [jar:file:/home/ahadoop/apache-hive-2.1.1-bin/lib/log4j-slf4j-impl-2.4.1.jar!/org/slf4j/impl/StaticLoggerBinder.class] SLF4J: Found binding in [jar:file:/home/ahadoop/hadoop-2.8.0/share/hadoop/common/lib/slf4j-log4j12-1.7.10.jar!/org/slf4j/impl/StaticLoggerBinder.class] SLF4J: See http://www.slf4j.org/codes.html#multiple_bindings for an explanation. SLF4J: Actual binding is of type [org.apache.logging.slf4j.Log4jLoggerFactory] [1]+ Exit 1 hive --service hwi [ahadoop@31d48048cb1e ~]$ tail /tmp/ahadoop/hive.log 2017-06-25T00:37:39,289 INFO [main] hwi.HWIServer: HWI is starting up 2017-06-25T00:37:39,328 INFO [main] conf.HiveConf: Found configuration file file:/home/ahadoop/apache-hive-2.1.1-bin/conf/hive-site.xml 2017-06-25T00:37:40,651 ERROR [main] hwi.HWIServer: HWI WAR file not found at /home/ahadoop/apache-hive-2.1.1-bin//home/ahadoop/apache-hive-2.1.1-bin/lib/hive-hwi-2.1.1.war
该异常是找不到 war 文件,其原因是hwi启动脚本($HIVE_HOME/bin/ext/hwi.sh)的bug,hwi.sh里面用的是完整路径,而HWIServer类中的代码用的相对路径:
String hwiWAR = conf.getVar(HiveConf.ConfVars.HIVEHWIWARFILE); String hivehome = System.getenv().get("HIVE_HOME"); File hwiWARFile = new File(hivehome, hwiWAR); if (!hwiWARFile.exists()) { l4j.fatal("HWI WAR file not found at " + hwiWARFile.toString()); System.exit(1); }
因此,会报错。通过修改hive-site.xml,将hive.hwi.war.file的路径改为相对路径,与HWIServer类的代码一致,则可避免这个问题
vi $HIVE_HOME/conf/hive-site.xml <property> <name>hive.hwi.war.file</name> <value>lib/hive-hwi-2.1.1.war</value> </property>
再次启动后,仍然报错
When initializing hive with no arguments, the CLI is invoked. Hive has an extension architecture used to start other hive demons. Jetty requires Apache Ant to start HWI. You should define ANT_LIB as an environment variable or add that to the hive invocation.
原因是hwi使用Jetty作为web容器,而该容器需要Apache Ant才能启动,因此还需要安装Apache Ant
a、从Apache Ant官网下载压缩包(apache-ant-1.10.1-bin.tar.gz)
b、解压
tar -zxvf apache-ant-1.10.1-bin.tar.gz
c、配置环境变量
vi .bash_profile export ANT_HOME=/home/ahadoop/apache-ant-1.10.1 export ANT_LIB=$ANT_HOME/lib export CLASSPATH=$CLASSPATH:$ANT_LIB export PATH=$PATH:$ANT_HOME/bin
执行 source .bash_profile 使环境变量生效
完成了 apache ant 安装后,再次启动 hwi
hive --service hwi &
已经可顺序启动了,通过在浏览器输入网站 http://172.17.0.1:9999/hwi 访问 hwi 页面,仍然报错,如下图
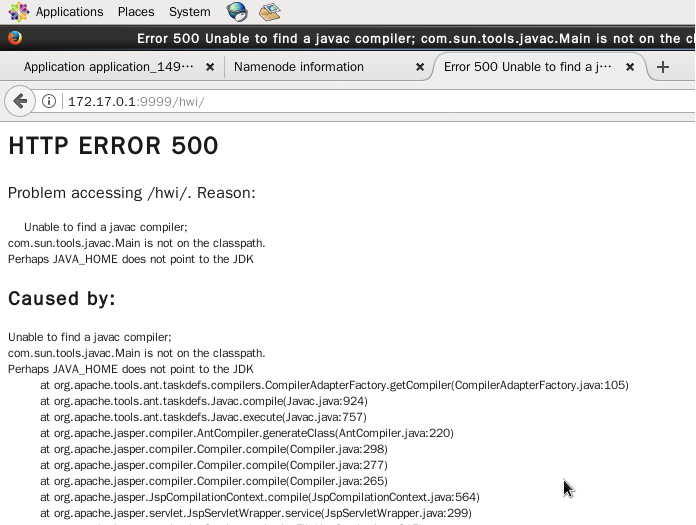
这个页面报错是
Unable to find a javac compiler; com.sun.tools.javac.Main is not on the classpath. Perhaps JAVA_HOME does not point to the JDK
明明已经在环境变量中配置了JAVA_HOME,怎么还会报错呢,经查,是由于$HIVE_HOME/lib下没有tools.jar所致,因此,对 $JAVA_HOME/lib/tools.jar 创建一个软链接到 $HIVE_HOME/lib
ln -s $JAVA_HOME/lib/tools.jar $HIVE_HOME/lib/
重新启动 hive --service hwi & 之后,再访问 http://172.17.0.1:9999/hwi ,还是报错,如下图
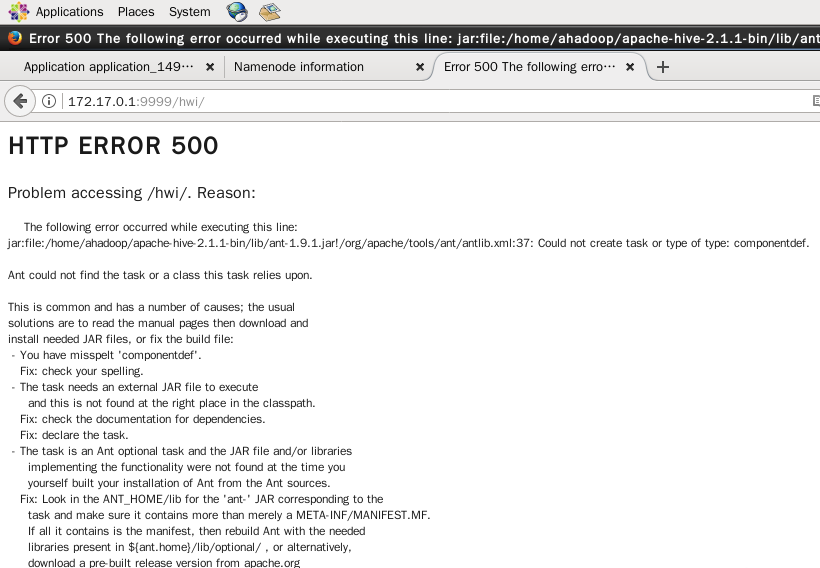
报异常信息
The following error occurred while executing this line: jar:file:/home/ahadoop/apache-hive-2.1.1.bin/lib/ant-1.9.1.jar!/org/apache/tools/ant/antlib.xml:37:Could not create task or type of type:componentdef. Ant could not find the task or a class this task relies upon.
经查,主要是 ant 版本的问题导致的,$HIVE_HOME/lib下的ant.jar版本为1.9.1,而刚才新安装的ant版本为1.10.1,因此,需要把{ANT_HOME}/lib下的ant.jar包copy到${HIVE_HOME}/lib下
cp ${ANT_HOME}/lib/ant.jar ${HIVE_HOME}/lib/ant-1.10.1.jar
重新启动 hive --service hwi & 之后,再访问 http://172.17.0.1:9999/hwi 页面,终于可正常访问了
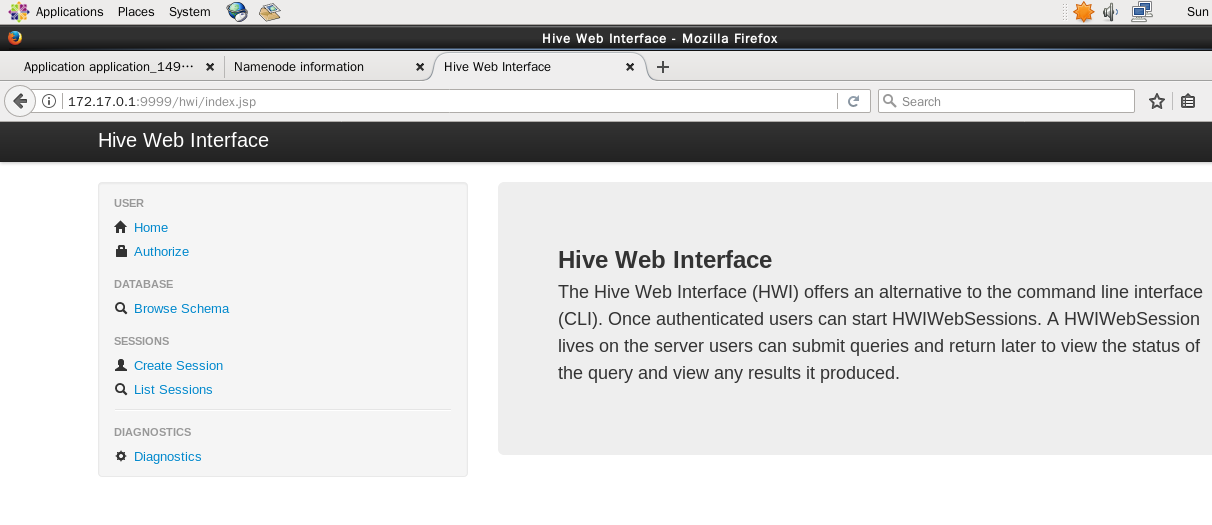
点击左边菜单 Browse Schema 可查看数据表情况
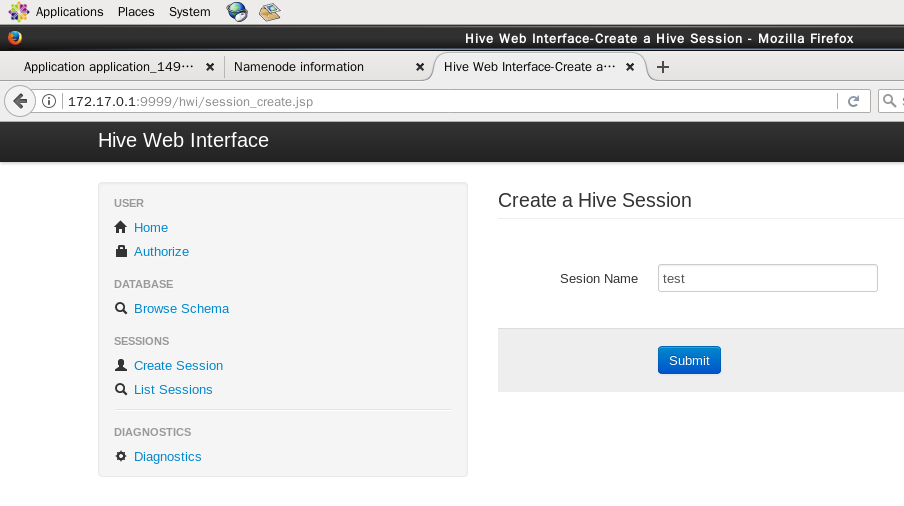
点击左边菜单 Create Session 可创建一个会话(会话名 test),如下图
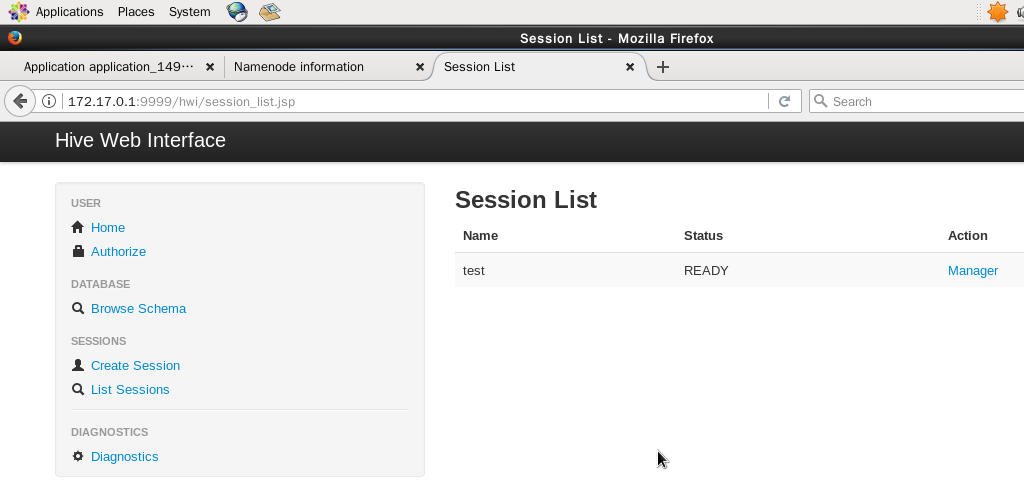
点击左边菜单 List Sessions 可显示会话列表,如下图
点击 Manager 按钮可进入该会话的管理页面,如下图
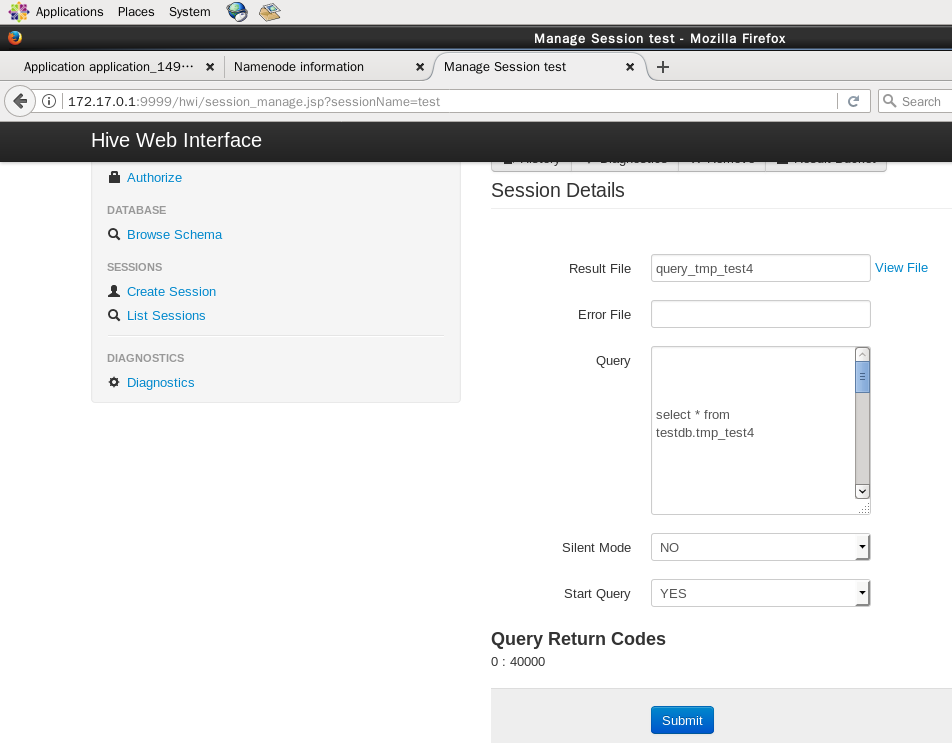
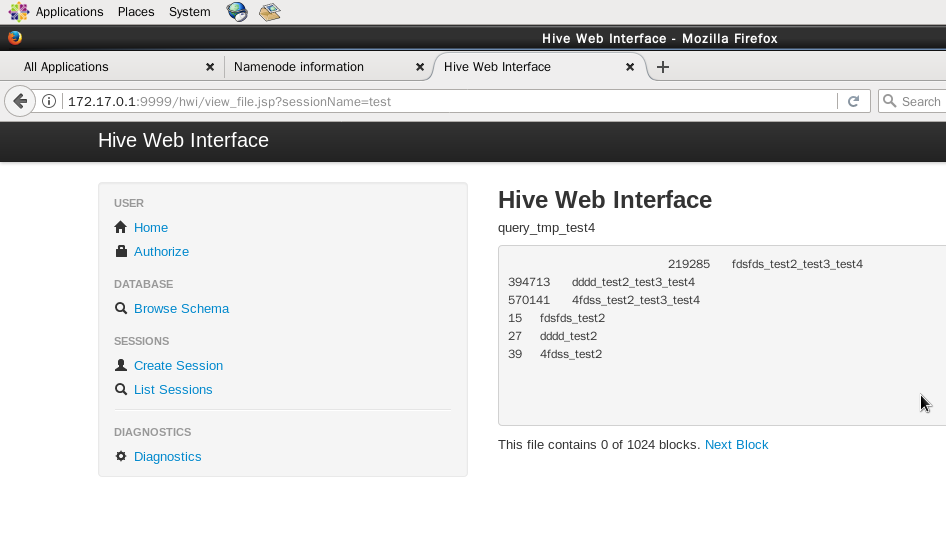
在会话管理页面中,可执行hql脚本。在 Result File 中输入个结果文件名,在 Query 编辑框中输入 hql 脚本(本实验的脚本为 select * from testdb.tmp_test4),在 Start Query 中选择 YES,然后点击下方的 Submit 按钮提交会话,即可执行 hql 脚本。执行后,点击 Result File 编辑框右边的 View File 按钮,可查看运行结果,如下图
从上面使用 hwi 的过程可以看出,执行 hql 脚本的过程没有任何提示,不知道某一个查询执行是什么时候结束的,只能在服务端才可以看到执行过程日志信息,而且使用起来也不是很方便。针对数据分析人员,一般还是建议用CLI操作Hive,效率比较高。
(5)关于 hive metastore 的问题
按官网的介绍,不管是使用Hive CLI、客户端还是HWI访问Hive,都需要首先启动Hive 元数据服务,否则无法访问Hive数据库。否则会报异常
15/01/09 16:37:58 INFO hive.metastore: Trying to connect to metastore with URI thrift://172.17.0.1:9083 15/01/09 16:37:58 WARN hive.metastore: Failed to connect to the MetaStore Server... 15/01/09 16:37:58 INFO hive.metastore: Waiting 1 seconds before next connection attempt.
使用 hive --service metastore 命令即可启动 metastore 服务
[ahadoop@31d48048cb1e ~]$ hive --service metastore Starting Hive Metastore Server 15/01/09 16:38:52 INFO Configuration.deprecation: mapred.reduce.tasks is deprecated. Instead, use mapreduce.job.reduces 15/01/09 16:38:52 INFO Configuration.deprecation: mapred.min.split.size is deprecated. Instead, use mapreduce.input.fileinputformat.split.minsize 15/01/09 16:38:52 INFO Configuration.deprecation: mapred.reduce.tasks.speculative.execution is deprecated. Instead, use mapreduce.reduce.speculative 15/01/09 16:38:52 INFO Configuration.deprecation: mapred.min.split.size.per.node is deprecated. Instead, use mapreduce.input.fileinputformat.split.minsize.per.node 15/01/09 16:38:52 INFO Configuration.deprecation: mapred.input.dir.recursive is deprecated. Instead, use mapreduce.input.fileinputformat.input.dir.recursive
但在本实验中,不启动 metastore 服务也能通过 hwi 正常访问 hive 里面的数据,可能跟新版本的机制有关
5、安装配置 HCatalog
HCatalog是Hadoop的元数据和数据表的管理系统,它是基于Hive的元数据层,通过类SQL的语言展现Hadoop数据的关联关系,支持Hive、Pig、MapReduce等共享数据和元数据,使用户在编写应用程序时无需关心数据是怎么存储、存在哪里,避免用户因schema和存储格式的改变而受到影响。HCatalog的这种灵活性,使得在不影响到使用者的应用程序读取数据的情况下,数据产生者可以在数据中增加新列。在不影响生产者或使用者的情况下,管理员可以迁移数据或是改变数据的存储格式。如下图
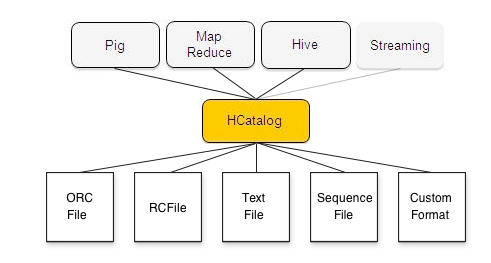
从上图可看出,HCatalog低层支持多种文件格式的数据存储方法,上层支持Pig、MapReduce、Hive、Streaming等多种应用。
这样的好处在于,可以支持不同的工具集和系统能在一起使用,例如数据分析团队,一开始可能只使用一种工具(如Hive,Pig,Map Reduce),而随着数据分析工作的深入,需要多种工具相结合,如刚开始使用Hive进行分析查询的用户,后面还需要使用Pig为ETL过程处理或建立数据模型;刚开始使用Pig的用户发现,他们更想使用Hive进行分析查询。在这些情况下,通过HCatalog提供了元数据之间的共享,使用户更方便的在不同工具间切换操作,比如在 Map Reduce或Pig中载入数据并进行规范化,然后通过Hive进行分析,当这些工具都共享一个metastore时,各个工具的用户就能够即时访问其他工具创建的数据,而无需载入和传输的步骤,非常高效、方便。
Apache Hive 对 HCatalog 有详细的介绍说明。从 hive 0.11.0 版本之后,hive 安装包便提供了 hcatalog,也即安装hive后,里面就已经有了hcatalog了(官网说明)。接下来将介绍如何配置使用 HCatalog
(1)配置环境变量
vi ~/.bash_profile export PATH=$PATH:$HIVE_HOME/hcatalog/bin:$HIVE_HOME/hcatalog/sbin # 使用环境变量生效 source ~/.bash_profile
(2)启动 hcatalog
hcat_server.sh start &
启动后,程序报错,如下
Started metastore server init, testing if initialized correctly... /usr/local/hive/hcatalog/sbin/hcat_server.sh: line 91: /usr/local/hive/hcatalog/sbin/../var/log/hcat.out: No such file or directory.Metastore startup failed, see /usr/local/hive/hcatalog/sbin/../var/log/hcat.err
报错的是log路径不存在(跟前面介绍的hwi相对路径、绝对路径类似),这时通过指定一个hive用户具有写权限的路径,然后在启动脚本里export变量HCAT_LOG_DIR指定路径,如下:
# 建立log目录,如 /tmp/ahadoop/hcat mkdir /tmp/ahadoop/hcat # 在 hcat_server.sh 文件开头指定log目录(加上以下export指令) vi ${HIVE_HOME}/hcatalog/sbin/hcat_server.sh export HCAT_LOG_DIR=/tmp/ahadoop/hcat
重新启动后 hcat_server.sh start ,还是报异常
经查,是端口冲突,如果原先已经开启了 hive --service metastore & ,则会占用了9083端口。而在开启 hcat_server.sh start 时,会再重新开启 metastore 服务,使用9083端口。这是因为 hcatalog 的目的就是要管理元数据的,因此自己会开启 metastore 服务用于管理元数据,而如果其它应用也启动了 metastore 服务,则可能会造成不一致。
将 hive --service metastore 的服务结束后,再启动 hcat_server.sh start & ,即可顺利启动 hcat_server
[ahadoop@31d48048cb1e ~]$ hcat_server.sh start & [2] 6763 [ahadoop@31d48048cb1e ~]$ Started metastore server init, testing if initialized correctly... Metastore initialized successfully on port[9083]. [2]+ Done hcat_server.sh start
hcat 是 hcatalog 的客户端操作入口,官网有介绍了详细的使用(hcatalog client 命令官网介绍)
使用 hcat -e 可执行元数据操作的命令(使用SQL语句,非常方便),例如
hcat -e"show databases" hcat -e"show tables" hcat -e"create table tmp_test5(a string,b int)" hcat -e"desc tmp_test5" hcat -e"drop table tmp_test5"
创建/修改/删除数据表,查看数据表结构等等,这些跟元数据相关的DDL语句都是支持的。以下语句就不支持:
ALTER INDEX ... REBUILD
CREATE TABLE ... AS SELECT
ALTER TABLE ... CONCATENATE
ALTER TABLE ARCHIVE/UNARCHIVE PARTITION
ANALYZE TABLE ... COMPUTE STATISTICS
IMPORT FROM ...
EXPORT TABLE
另外,如果执行 hcat -e"select * from tmp_test5",也是不支持的,因为hcatalog主要是用来管理元数据的,而不是分析使用的,因此,不能跟hive等同
使用 hcat_server.sh stop 可停止 hcatalog 服务
hcat_srever.sh stop
6、WebHCat
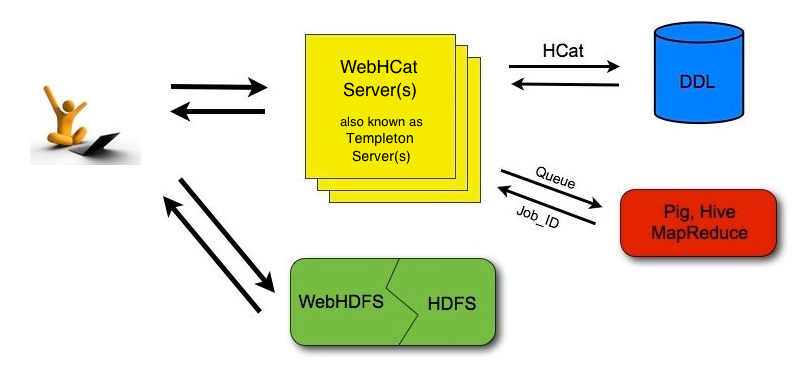
WebHCat是为HCatalog提供REST API的服务,自hive 0.11.0 版本之后,hive 中也自带了 webhcat (官网介绍说明),如下图,通过WebHCat,程序能够通过REST的API很安全的链接和操作HCatalog提供的服务,方便Hive、Pig、MapReduce等应用使用。(类似于通过WebHDFS以web的方式来操作HDFS)
使用以下命令启动 webhcat,默认的web端口为50111(须先启动 hcat_srever.sh start)
webhcat_server.sh start &
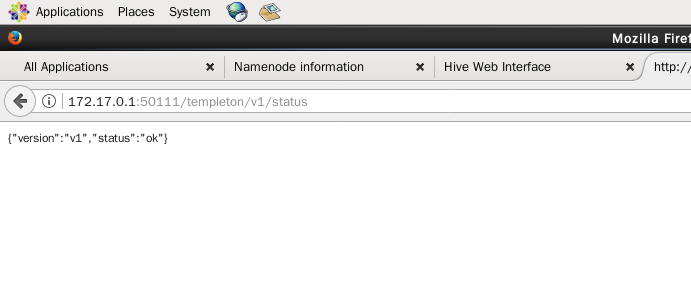
(1)在浏览器输入 http://172.17.0.1:50111/templeton/v1/status 可查看 hcatalog 的状态,如下图
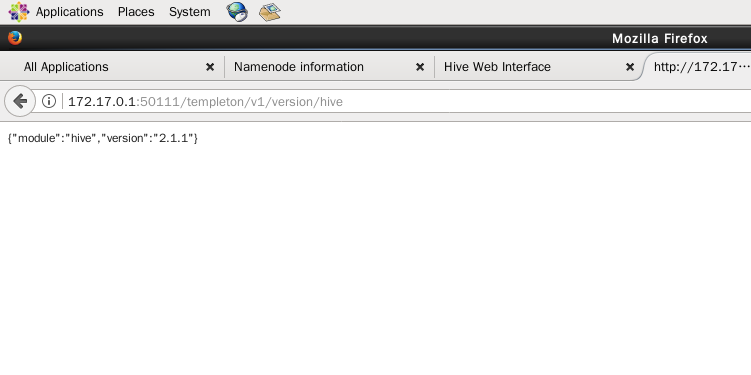
(2)在浏览器输入 http://172.17.0.1:50111/templeton/v1/version/hive 可查看 hive 的版本,如下图
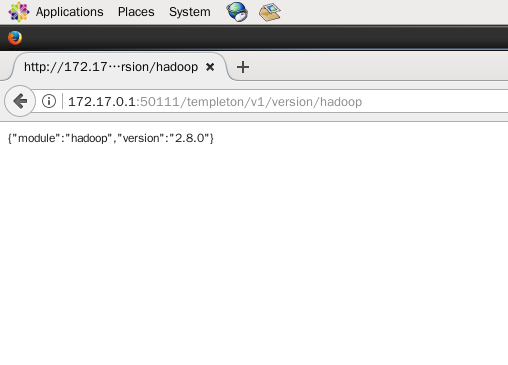
(3)在浏览器输入 http://172.17.0.1:50111/templeton/v1/version/hadoop 可查看 hadoop 的版本,如下图
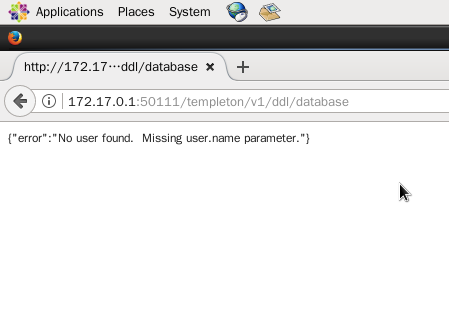
(4)在浏览器输入 http://172.17.0.1:50111/templeton/v1/ddl/database 查看元数据的数据库信息,但却报错了,如下图
这是因为像ddl这些操作,需要指定用户,因此,指定使用账号(hcat所在linux服务器的账号ahadoop)
在浏览器输入 http://172.17.0.1:50111/templeton/v1/ddl/database?user.name=ahadoop 查看元数据的数据库信息,还是报错了,如下图
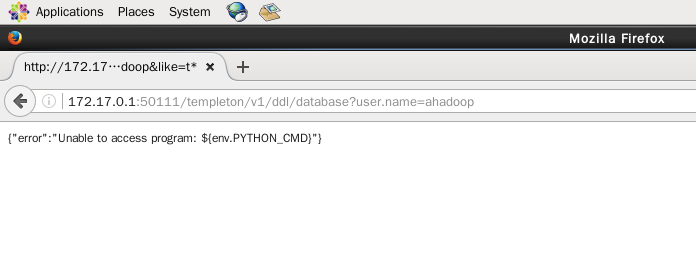
报错信息为 {"error":"Unable to access program:${env.PYTHON_CMD}"},识别不到 python 路径
这时配置环境变量
vi ~/.bash_profile export PYTHON_CMD=/usr/bin/python # 使用环境变量生效 source ~/.bash_profile
重新启动 webhcat
[ahadoop@31d48048cb1e ~]$ webhcat_server.sh stop Lenght of string is non zero webhcat: stopping ... webhcat: stopping ... stopped webhcat: done [ahadoop@31d48048cb1e ~]$ webhcat_server.sh start & [2] 3758 [ahadoop@31d48048cb1e ~]$ Lenght of string is non zero webhcat: starting ... webhcat: /home/ahadoop/hadoop-2.8.0/bin/hadoop jar /home/ahadoop/apache-hive-2.1.1-bin/hcatalog/sbin/../share/webhcat/svr/lib/hive-webhcat-2.1.1.jar org.apache.hive.hcatalog.templeton.Main webhcat: starting ... started. webhcat: done [2]+ Done webhcat_server.sh start
在浏览器输入 http://172.17.0.1:50111/templeton/v1/ddl/database?user.name=ahadoop 查看元数据的数据库信息,继续报错,错误信息为
/home/ahadoop/hadoop-2.8.0/bin/hadoop: line 27: /home/ahadoop/../libexec/hadoop-config.sh:No such file or directory\n/home/ahadoop/hadoop-2.8.0/bin/hadoop: line 166:exec:: not found\n"
这是提示找不到 libexec 的路径,这时,根据提示,编辑 hadoop 执行文件的27行,进行以下修改
# 编辑 hadoop 可执行文件 vi $HADOOP_HOME/bin/hadoop # 定位到26行,将 HADOOP_LIBEXEC_DIR 注释掉 # HADOOP_LIBEXEC_DIR=${HADOOP_LIBEXEC_DIR:-$DEFAULT_LIBEXEC_DIR} # 然后增加1行,写上 HADOOP_LIBEXEC_DIR 路径 HADOOP_LIBEXEC_DIR=$HADOOP_HOME/libexec
重新启动 webhcat
[ahadoop@31d48048cb1e ~]$ webhcat_server.sh stop Lenght of string is non zero webhcat: stopping ... webhcat: stopping ... stopped webhcat: done [ahadoop@31d48048cb1e ~]$ webhcat_server.sh start & [2] 3758 [ahadoop@31d48048cb1e ~]$ Lenght of string is non zero webhcat: starting ... webhcat: /home/ahadoop/hadoop-2.8.0/bin/hadoop jar /home/ahadoop/apache-hive-2.1.1-bin/hcatalog/sbin/../share/webhcat/svr/lib/hive-webhcat-2.1.1.jar org.apache.hive.hcatalog.templeton.Main webhcat: starting ... started. webhcat: done [2]+ Done webhcat_server.sh start
然后,在浏览器输入 http://172.17.0.1:50111/templeton/v1/ddl/database?user.name=ahadoop 查看元数据的数据库信息,还是继续报错(晕,心中万马奔腾啊……)
{"statement":"show databases like 't*';","error":"unable to show databases for: t*","exec":{"stdout":"","stderr":"which: no /home/ahadoop/hadoop-2.8.0/bin/hadoop in ((null))\ndirname: missing operand\nTry `dirname --help' for more information.\nSLF4J: Class path contains multiple SLF4J bindings.\nSLF4J: Found binding in [jar:file:/home/ahadoop/hadoop-2.8.0/share/hadoop/common/lib/slf4j-log4j12-1.7.10.jar!/org/slf4j/impl/StaticLoggerBinder.class]\nSLF4J: Found binding in [jar:file:/home/ahadoop/apache-hive-2.1.1-bin/lib/log4j-slf4j-impl-2.4.1.jar!/org/slf4j/impl/StaticLoggerBinder.class]\nSLF4J: See http://www.slf4j.org/codes.html#multiple_bindings for an explanation.\nSLF4J: Actual binding is of type [org.slf4j.impl.Log4jLoggerFactory]\n17/06/28 03:03:50 INFO conf.HiveConf: Found configuration file file:/home/ahadoop/apache-hive-2.1.1-bin/conf/hive-site.xml\n17/06/28 03:03:54 WARN util.NativeCodeLoader: Unable to load native-hadoop library for your platform... using builtin-java classes where applicable\n17/06/28 03:03:54 INFO metastore.HiveMetaStore: 0: Opening raw store with implementation class:org.apache.hadoop.hive.metastore.ObjectStore\n17/06/28 03:03:54 INFO metastore.ObjectStore: ObjectStore, initialize called\n17/06/28 03:03:54 INFO DataNucleus.Persistence: Property hive.metastore.integral.jdo.pushdown unknown - will be ignored\n17/06/28 03:03:54 INFO DataNucleus.Persistence: Property datanucleus.cache.level2 unknown - will be ignored\n17/06/28 03:03:56 INFO DataNucleus.Persistence: Managing Persistence of org.apache.hadoop.hive.metastore.model.MSerDeInfo since it was managed previously\n17/06/28 03:03:57 INFO DataNucleus.Persistence: Managing Persistence of org.apache.hadoop.hive.metastore.model.MPartition since it was managed previously\n17/06/28 03:03:57 INFO DataNucleus.Persistence: Managing Persistence of org.apache.hadoop.hive.metastore.model.MColumnDescriptor since it was managed previously\n17/06/28 03:03:57 INFO DataNucleus.Persistence: Managing Persistence of org.apache.hadoop.hive.metastore.model.MTablePrivilege since it was managed previously\n17/06/28 03:03:57 INFO DataNucleus.Persistence: Managing Persistence of org.apache.hadoop.hive.metastore.model.MGlobalPrivilege since it was managed previously\n17/06/28 03:03:57 INFO DataNucleus.Persistence: Managing Persistence of org.apache.hadoop.hive.metastore.model.MTable since it was managed previously\n17/06/28 03:03:57 INFO DataNucleus.Persistence: Managing Persistence of org.apache.hadoop.hive.metastore.model.MPartitionColumnStatistics since it was managed previously\n17/06/28 03:03:57 INFO DataNucleus.Persistence: Managing Persistence of org.apache.hadoop.hive.metastore.model.MRole since it was managed previously\n17/06/28 03:03:57 INFO DataNucleus.Persistence: Managing Persistence of org.apache.hadoop.hive.metastore.model.MTableColumnStatistics since it was managed previously\n17/06/28 03:03:57 INFO DataNucleus.Persistence: Managing Persistence of org.apache.hadoop.hive.metastore.model.MStringList since it was managed previously\n17/06/28 03:03:57 INFO DataNucleus.Persistence: Managing Persistence of org.apache.hadoop.hive.metastore.model.MFunction since it was managed previously\n17/06/28 03:03:57 INFO DataNucleus.Persistence: Managing Persistence of org.apache.hadoop.hive.metastore.model.MDatabase since it was managed previously\n17/06/28 03:03:57 INFO DataNucleus.Persistence: Managing Persistence of org.apache.hadoop.hive.metastore.model.MStorageDescriptor since it was managed previously\n17/06/28 03:03:57 INFO DataNucleus.Persistence: Managing Persistence of org.apache.hadoop.hive.metastore.model.MVersionTable since it was managed previously\n17/06/28 03:03:57 INFO metastore.ObjectStore: Setting MetaStore object pin classes with hive.metastore.cache.pinobjtypes=\"Table,StorageDescriptor,SerDeInfo,Partition,Database,Type,FieldSchema,Order\"\n17/06/28 03:03:57 INFO metastore.MetaStoreDirectSql: Using direct SQL, underlying DB is MYSQL\n17/06/28 03:03:57 INFO metastore.ObjectStore: Initialized ObjectStore\n17/06/28 03:03:58 INFO metastore.HiveMetaStore: Added admin role in metastore\n17/06/28 03:03:58 INFO metastore.HiveMetaStore: Added public role in metastore\n17/06/28 03:03:58 INFO metastore.HiveMetaStore: No user is added in admin role, since config is empty\n17/06/28 03:03:58 INFO metastore.HiveMetaStore: 0: get_all_functions\n17/06/28 03:03:58 INFO HiveMetaStore.audit: ugi=ahadoop\tip=unknown-ip-addr\tcmd=get_all_functions\t\n Command was terminated due to timeout(10000ms). See templeton.exec.timeout property","exitcode":143}}
根据提示,是用户的问题,因此,跟 hcatalog 的配置一样,设置超级代理用户(使用webhcat所在的服务器linux账号ahadoop)
cp $HIVE_HOME/hcatalog/etc/webhcat/webhcat-default.xml $HIVE_HOME/hcatalog/etc/webhcat/webhcat-site.xml vi $HIVE_HOME/hcatalog/etc/webhcat/webhcat-site.xml # 修改以下两个配置项,将用户名 ahadoop 写在 proxyuser 后面。 <property> <name>webhcat.proxyuser.ahadoop.hosts</name> <value>*</value> </property> <property> <name>webhcat.proxyuser.ahadoop.groups</name> <value>*</value> </property> # 修改超时时间,默认为10秒,改长一些,否则后面还会报超时 <property> <name>templeton.exec.timeout</name> <value>60000</value> <description> How long in milliseconds a program is allowed to run on the Templeton box. </description> </property>
完成配置后,再重新启动webhcat
[ahadoop@31d48048cb1e ~]$ webhcat_server.sh stop Lenght of string is non zero webhcat: stopping ... webhcat: stopping ... stopped webhcat: done [ahadoop@31d48048cb1e ~]$ webhcat_server.sh start & [2] 3758 [ahadoop@31d48048cb1e ~]$ Lenght of string is non zero webhcat: starting ... webhcat: /home/ahadoop/hadoop-2.8.0/bin/hadoop jar /home/ahadoop/apache-hive-2.1.1-bin/hcatalog/sbin/../share/webhcat/svr/lib/hive-webhcat-2.1.1.jar org.apache.hive.hcatalog.templeton.Main webhcat: starting ... started. webhcat: done [2]+ Done webhcat_server.sh start
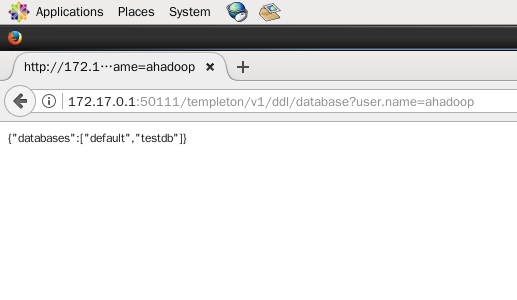
在浏览器输入 http://172.17.0.1:50111/templeton/v1/ddl/database?user.name=ahadoop 查看元数据的数据库信息,终于可以正常访问了
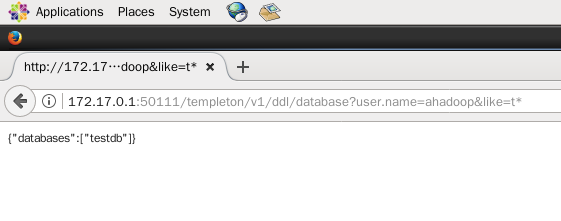
如果需要加筛选条件,则在url后面加上like,例如筛选以t开头的数据库名称,则在浏览器中输入
http://172.17.0.1:50111/templeton/v1/ddl/database?user.name=ahadoop&like=t*
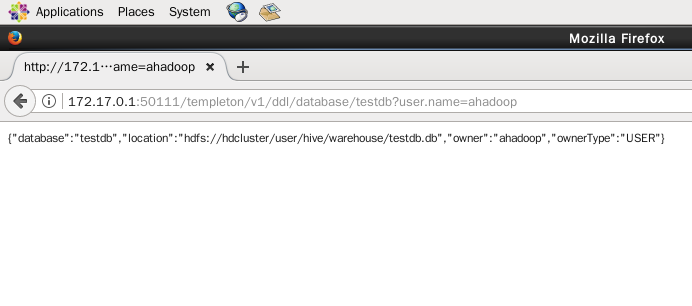
(5)查看某个数据库的信息,则在database后面指定数据库名(如本实验的testdb数据库),在浏览器输入 http://172.17.0.1:50111/templeton/v1/ddl/database/testdb?user.name=ahadoop
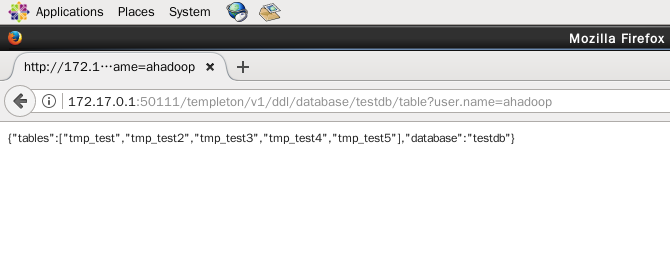
(6)查看某个数据库里面所有数据表的信息,则需要加上table关键字(如本实验的testdb数据库),在浏览器输入 http://172.17.0.1:50111/templeton/v1/ddl/database/testdb/table?user.name=ahadoop
(7)查看某个数据库、某张表的信息,则需要加上数据表名(如本实验的testdb数据库、tmp_test3数据表),在浏览器输入 http://172.17.0.1:50111/templeton/v1/ddl/database/testdb/table/tmp_test3?user.name=ahadoop

(8)使用 webhcat_server.sh stop 可终止 webhcat 服务
webhcat_server.sh stop
6、结语
通过以上的配置,完成了 hive、beeline、hwi、HCatalog、WebHCat 等组件安装和使用,也了解到了他们的功能。hive 目前一直在持续更新版本,期待未来有更多好用的特性,为Hadoop的数据分析处理人员,带来更高效的工具。

