
前言
Netty 是一个高性能的 NIO 网络框架,本文基于 SpringBoot 以常见的心跳机制来认识 Netty。
最终能达到的效果:
- 客户端每隔 N 秒检测是否需要发送心跳。
- 服务端也每隔 N 秒检测是否需要发送心跳。
- 服务端可以主动 push 消息到客户端。
- 基于 SpringBoot 监控,可以查看实时连接以及各种应用信息。
效果如下:
IdleStateHandler
Netty 可以使用 IdleStateHandler 来实现连接管理,当连接空闲时间太长(没有发送、接收消息)时则会触发一个事件,我们便可在该事件中实现心跳机制。
客户端心跳
当客户端空闲了 N 秒没有给服务端发送消息时会自动发送一个心跳来维持连接。
核心代码代码如下:
public class EchoClientHandle extends SimpleChannelInboundHandler<ByteBuf> { private final static Logger LOGGER = LoggerFactory.getLogger(EchoClientHandle.class); @Override public void userEventTriggered(ChannelHandlerContext ctx, Object evt) throws Exception { if (evt instanceof IdleStateEvent){ IdleStateEvent idleStateEvent = (IdleStateEvent) evt ; if (idleStateEvent.state() == IdleState.WRITER_IDLE){ LOGGER.info("已经 10 秒没有发送信息!"); //向服务端发送消息 CustomProtocol heartBeat = SpringBeanFactory.getBean("heartBeat", CustomProtocol.class); ctx.writeAndFlush(heartBeat).addListener(ChannelFutureListener.CLOSE_ON_FAILURE) ; } } super.userEventTriggered(ctx, evt); } @Override protected void channelRead0(ChannelHandlerContext channelHandlerContext, ByteBuf in) throws Exception { //从服务端收到消息时被调用 LOGGER.info("客户端收到消息={}",in.toString(CharsetUtil.UTF_8)) ; } }
实现非常简单,只需要在事件回调中发送一个消息即可。
由于整合了 SpringBoot ,所以发送的心跳信息是一个单例的 Bean。
@Configuration public class HeartBeatConfig { @Value("${channel.id}") private long id ; @Bean(value = "heartBeat") public CustomProtocol heartBeat(){ return new CustomProtocol(id,"ping") ; } }
这里涉及到了自定义协议的内容,请继续查看下文。
当然少不了启动引导:
@Component public class HeartbeatClient { private final static Logger LOGGER = LoggerFactory.getLogger(HeartbeatClient.class); private EventLoopGroup group = new NioEventLoopGroup(); @Value("${netty.server.port}") private int nettyPort; @Value("${netty.server.host}") private String host; private SocketChannel channel; @PostConstruct public void start() throws InterruptedException { Bootstrap bootstrap = new Bootstrap(); bootstrap.group(group) .channel(NioSocketChannel.class) .handler(new CustomerHandleInitializer()) ; ChannelFuture future = bootstrap.connect(host, nettyPort).sync(); if (future.isSuccess()) { LOGGER.info("启动 Netty 成功"); } channel = (SocketChannel) future.channel(); } } public class CustomerHandleInitializer extends ChannelInitializer<Channel> { @Override protected void initChannel(Channel ch) throws Exception { ch.pipeline() //10 秒没发送消息 将IdleStateHandler 添加到 ChannelPipeline 中 .addLast(new IdleStateHandler(0, 10, 0)) .addLast(new HeartbeatEncode()) .addLast(new EchoClientHandle()) ; } }
所以当应用启动每隔 10 秒会检测是否发送过消息,不然就会发送心跳信息。

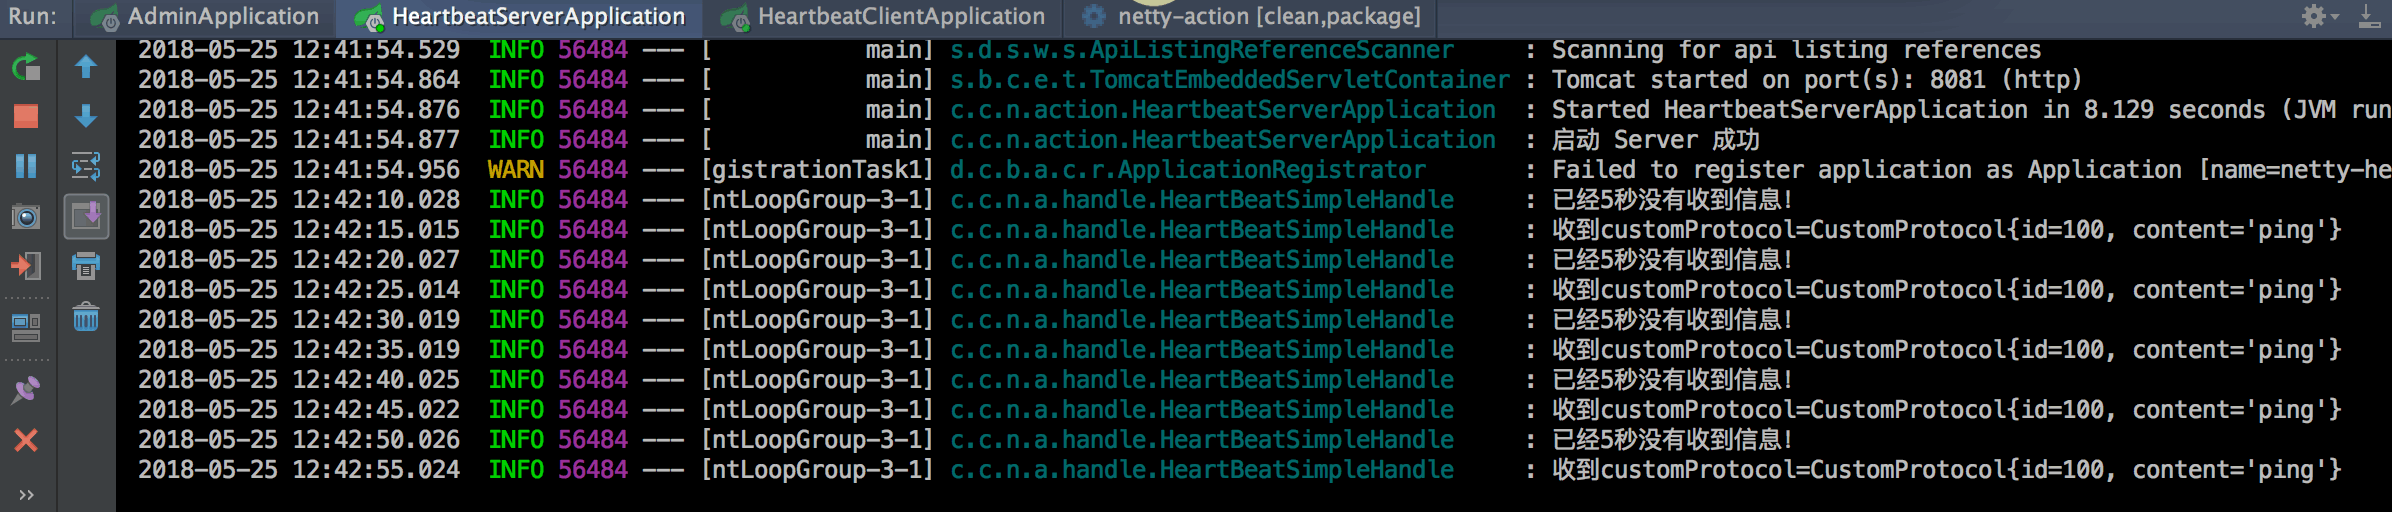
服务端心跳
服务器端的心跳其实也是类似,也需要在 ChannelPipeline 中添加一个 IdleStateHandler 。
public class HeartBeatSimpleHandle extends SimpleChannelInboundHandler<CustomProtocol> { private final static Logger LOGGER = LoggerFactory.getLogger(HeartBeatSimpleHandle.class); private static final ByteBuf HEART_BEAT = Unpooled.unreleasableBuffer(Unpooled.copiedBuffer(new CustomProtocol(123456L,"pong").toString(),CharsetUtil.UTF_8)); /** * 取消绑定 * @param ctx * @throws Exception */ @Override public void channelInactive(ChannelHandlerContext ctx) throws Exception { NettySocketHolder.remove((NioSocketChannel) ctx.channel()); } @Override public void userEventTriggered(ChannelHandlerContext ctx, Object evt) throws Exception { if (evt instanceof IdleStateEvent){ IdleStateEvent idleStateEvent = (IdleStateEvent) evt ; if (idleStateEvent.state() == IdleState.READER_IDLE){ LOGGER.info("已经5秒没有收到信息!"); //向客户端发送消息 ctx.writeAndFlush(HEART_BEAT).addListener(ChannelFutureListener.CLOSE_ON_FAILURE) ; } } super.userEventTriggered(ctx, evt); } @Override protected void channelRead0(ChannelHandlerContext ctx, CustomProtocol customProtocol) throws Exception { LOGGER.info("收到customProtocol={}", customProtocol); //保存客户端与 Channel 之间的关系 NettySocketHolder.put(customProtocol.getId(),(NioSocketChannel)ctx.channel()) ; } }
这里有点需要注意:
当有多个客户端连上来时,服务端需要区分开,不然响应消息就会发生混乱。
所以每当有个连接上来的时候,我们都将当前的 Channel 与连上的客户端 ID 进行关联(因此每个连上的客户端 ID 都必须唯一)。
这里采用了一个 Map 来保存这个关系,并且在断开连接时自动取消这个关联。
public class NettySocketHolder { private static final Map<Long, NioSocketChannel> MAP = new ConcurrentHashMap<>(16); public static void put(Long id, NioSocketChannel socketChannel) { MAP.put(id, socketChannel); } public static NioSocketChannel get(Long id) { return MAP.get(id); } public static Map<Long, NioSocketChannel> getMAP() { return MAP; } public static void remove(NioSocketChannel nioSocketChannel) { MAP.entrySet().stream().filter(entry -> entry.getValue() == nioSocketChannel).forEach(entry -> MAP.remove(entry.getKey())); } }
启动引导程序:
Component public class HeartBeatServer { private final static Logger LOGGER = LoggerFactory.getLogger(HeartBeatServer.class); private EventLoopGroup boss = new NioEventLoopGroup(); private EventLoopGroup work = new NioEventLoopGroup(); @Value("${netty.server.port}") private int nettyPort; /** * 启动 Netty * * @return * @throws InterruptedException */ @PostConstruct public void start() throws InterruptedException { ServerBootstrap bootstrap = new ServerBootstrap() .group(boss, work) .channel(NioServerSocketChannel.class) .localAddress(new InetSocketAddress(nettyPort)) //保持长连接 .childOption(ChannelOption.SO_KEEPALIVE, true) .childHandler(new HeartbeatInitializer()); ChannelFuture future = bootstrap.bind().sync(); if (future.isSuccess()) { LOGGER.info("启动 Netty 成功"); } } /** * 销毁 */ @PreDestroy public void destroy() { boss.shutdownGracefully().syncUninterruptibly(); work.shutdownGracefully().syncUninterruptibly(); LOGGER.info("关闭 Netty 成功"); } } public class HeartbeatInitializer extends ChannelInitializer<Channel> { @Override protected void initChannel(Channel ch) throws Exception { ch.pipeline() //五秒没有收到消息 将IdleStateHandler 添加到 ChannelPipeline 中 .addLast(new IdleStateHandler(5, 0, 0)) .addLast(new HeartbeatDecoder()) .addLast(new HeartBeatSimpleHandle()); } }
也是同样将IdleStateHandler 添加到 ChannelPipeline 中,也会有一个定时任务,每5秒校验一次是否有收到消息,否则就主动发送一次请求。

因为测试是有两个客户端连上所以有两个日志。
自定义协议
上文其实都看到了:服务端与客户端采用的是自定义的 POJO 进行通讯的。
所以需要在客户端进行编码,服务端进行解码,也都只需要各自实现一个编解码器即可。
CustomProtocol:
public class CustomProtocol implements Serializable{ private static final long serialVersionUID = 4671171056588401542L; private long id ; private String content ; //省略 getter/setter }
客户端的编码器:
public class HeartbeatEncode extends MessageToByteEncoder<CustomProtocol> { @Override protected void encode(ChannelHandlerContext ctx, CustomProtocol msg, ByteBuf out) throws Exception { out.writeLong(msg.getId()) ; out.writeBytes(msg.getContent().getBytes()) ; } }
也就是说消息的前八个字节为 header,剩余的全是 content。
服务端的解码器:
public class HeartbeatDecoder extends ByteToMessageDecoder { @Override protected void decode(ChannelHandlerContext ctx, ByteBuf in, List<Object> out) throws Exception { long id = in.readLong() ; byte[] bytes = new byte[in.readableBytes()] ; in.readBytes(bytes) ; String content = new String(bytes) ; CustomProtocol customProtocol = new CustomProtocol() ; customProtocol.setId(id); customProtocol.setContent(content) ; out.add(customProtocol) ; } }
只需要按照刚才的规则进行解码即可。
实现原理
其实联想到 IdleStateHandler 的功能,自然也能想到它实现的原理:
应该会存在一个定时任务的线程去处理这些消息。
来看看它的源码:
首先是构造函数:
public IdleStateHandler( int readerIdleTimeSeconds, int writerIdleTimeSeconds, int allIdleTimeSeconds) { this(readerIdleTimeSeconds, writerIdleTimeSeconds, allIdleTimeSeconds, TimeUnit.SECONDS); }
其实就是初始化了几个数据:
- readerIdleTimeSeconds:一段时间内没有数据读取
- writerIdleTimeSeconds:一段时间内没有数据发送
- allIdleTimeSeconds:以上两种满足其中一个即可
因为 IdleStateHandler 也是一种 ChannelHandler,所以会在 channelActive 中初始化任务:
@Override public void channelActive(ChannelHandlerContext ctx) throws Exception { // This method will be invoked only if this handler was added // before channelActive() event is fired. If a user adds this handler // after the channelActive() event, initialize() will be called by beforeAdd(). initialize(ctx); super.channelActive(ctx); } private void initialize(ChannelHandlerContext ctx) { // Avoid the case where destroy() is called before scheduling timeouts. // See: https://github.com/netty/netty/issues/143 switch (state) { case 1: case 2: return; } state = 1; initOutputChanged(ctx); lastReadTime = lastWriteTime = ticksInNanos(); if (readerIdleTimeNanos > 0) { readerIdleTimeout = schedule(ctx, new ReaderIdleTimeoutTask(ctx), readerIdleTimeNanos, TimeUnit.NANOSECONDS); } if (writerIdleTimeNanos > 0) { writerIdleTimeout = schedule(ctx, new WriterIdleTimeoutTask(ctx), writerIdleTimeNanos, TimeUnit.NANOSECONDS); } if (allIdleTimeNanos > 0) { allIdleTimeout = schedule(ctx, new AllIdleTimeoutTask(ctx), allIdleTimeNanos, TimeUnit.NANOSECONDS); } }
也就是会按照我们给定的时间初始化出定时任务。
接着在任务真正执行时进行判断:
private final class ReaderIdleTimeoutTask extends AbstractIdleTask { ReaderIdleTimeoutTask(ChannelHandlerContext ctx) { super(ctx); } @Override protected void run(ChannelHandlerContext ctx) { long nextDelay = readerIdleTimeNanos; if (!reading) { nextDelay -= ticksInNanos() - lastReadTime; } if (nextDelay <= 0) { // Reader is idle - set a new timeout and notify the callback. readerIdleTimeout = schedule(ctx, this, readerIdleTimeNanos, TimeUnit.NANOSECONDS); boolean first = firstReaderIdleEvent; firstReaderIdleEvent = false; try { IdleStateEvent event = newIdleStateEvent(IdleState.READER_IDLE, first); channelIdle(ctx, event); } catch (Throwable t) { ctx.fireExceptionCaught(t); } } else { // Read occurred before the timeout - set a new timeout with shorter delay. readerIdleTimeout = schedule(ctx, this, nextDelay, TimeUnit.NANOSECONDS); } } }
如果满足条件则会生成一个 IdleStateEvent 事件。
SpringBoot 监控
由于整合了 SpringBoot 之后不但可以利用 Spring 帮我们管理对象,也可以利用它来做应用监控。
actuator 监控
当我们为引入了:
<dependency> <groupId>org.springframework.boot</groupId> <artifactId>spring-boot-starter-actuator</artifactId> </dependency>
就开启了 SpringBoot 的 actuator 监控功能,他可以暴露出很多监控端点供我们使用。
如一些应用中的一些统计数据: 
存在的 Beans: 
更多信息请查看:https://docs.spring.io/spring-boot/docs/current/reference/html/production-ready-endpoints.html
但是如果我想监控现在我的服务端有多少客户端连上来了,分别的 ID 是多少?
其实就是实时查看我内部定义的那个关联关系的 Map。
这就需要暴露自定义端点了。
自定义端点
暴露的方式也很简单:
继承 AbstractEndpoint 并复写其中的 invoke 函数:
public class CustomEndpoint extends AbstractEndpoint<Map<Long,NioSocketChannel>> { /** * 监控端点的 访问地址 * @param id */ public CustomEndpoint(String id) { //false 表示不是敏感端点 super(id, false); } @Override public Map<Long, NioSocketChannel> invoke() { return NettySocketHolder.getMAP(); } }
其实就是返回了 Map 中的数据。
再配置一个该类型的 Bean 即可:
@Configuration public class EndPointConfig { @Value("${monitor.channel.map.key}") private String channelMap; @Bean public CustomEndpoint buildEndPoint(){ CustomEndpoint customEndpoint = new CustomEndpoint(channelMap) ; return customEndpoint ; } }
这样我们就可以通过配置文件中的 monitor.channel.map.key 来访问了:
一个客户端连接时: 
两个客户端连接时: 
整合 SBA
这样其实监控功能已经可以满足了,但能不能展示的更美观、并且多个应用也可以方便查看呢?
有这样的开源工具帮我们做到了:
https://github.com/codecentric/spring-boot-admin
简单来说我们可以利用该工具将 actuator 暴露出来的接口可视化并聚合的展示在页面中:

接入也很简单,首先需要引入依赖:
<dependency> <groupId>de.codecentric</groupId> <artifactId>spring-boot-admin-starter-client</artifactId> </dependency>
并在配置文件中加入:
# 关闭健康检查权限 management.security.enabled=false # SpringAdmin 地址 spring.boot.admin.url=http://127.0.0.1:8888
在启动应用之前先讲 SpringBootAdmin 部署好:
这个应用就是一个纯粹的 SpringBoot ,只需要在主函数上加入 @EnableAdminServer 注解。
@SpringBootApplication @Configuration @EnableAutoConfiguration @EnableAdminServer public class AdminApplication { public static void main(String[] args) { SpringApplication.run(AdminApplication.class, args); } }
引入:
<dependency> <groupId>de.codecentric</groupId> <artifactId>spring-boot-admin-starter-server</artifactId> <version>1.5.7</version> </dependency> <dependency> <groupId>de.codecentric</groupId> <artifactId>spring-boot-admin-server-ui</artifactId> <version>1.5.6</version> </dependency>
之后直接启动就行了。
这样我们在 SpringBootAdmin 的页面中就可以查看很多应用信息了。

更多内容请参考官方指南:
http://codecentric.github.io/spring-boot-admin/1.5.6/
自定义监控数据
其实我们完全可以借助 actuator 以及这个可视化页面帮我们监控一些简单的度量信息。
比如我在客户端和服务端中写了两个 Rest 接口用于向对方发送消息。
只是想要记录分别发送了多少次:
客户端:
@Controller @RequestMapping("/") public class IndexController { /** * 统计 service */ @Autowired private CounterService counterService; @Autowired private HeartbeatClient heartbeatClient ; /** * 向服务端发消息 * @param sendMsgReqVO * @return */ @ApiOperation("客户端发送消息") @RequestMapping("sendMsg") @ResponseBody public BaseResponse<SendMsgResVO> sendMsg(@RequestBody SendMsgReqVO sendMsgReqVO){ BaseResponse<SendMsgResVO> res = new BaseResponse(); heartbeatClient.sendMsg(new CustomProtocol(sendMsgReqVO.getId(),sendMsgReqVO.getMsg())) ; // 利用 actuator 来自增 counterService.increment(Constants.COUNTER_CLIENT_PUSH_COUNT); SendMsgResVO sendMsgResVO = new SendMsgResVO() ; sendMsgResVO.setMsg("OK") ; res.setCode(StatusEnum.SUCCESS.getCode()) ; res.setMessage(StatusEnum.SUCCESS.getMessage()) ; res.setDataBody(sendMsgResVO) ; return res ; } }
只要我们引入了 actuator 的包,那就可以直接注入 counterService ,利用它来帮我们记录数据。
当我们调用该接口时:


在监控页面中可以查询刚才的调用情况:

服务端主动 push 消息也是类似,只是需要在发送时候根据客户端的 ID 查询到具体的 Channel 发送:


总结
以上就是一个简单 Netty 心跳示例,并演示了 SpringBoot 的监控,之后会继续更新 Netty 相关内容,欢迎关注及指正。
本文所有代码:
https://github.com/crossoverJie/netty-action
号外
最近在总结一些 Java 相关的知识点,感兴趣的朋友可以一起维护。
地址: https://github.com/crossoverJie/Java-Interview


