前言:之前做的项目包括网上一些教程都是集很多配置和功能一起,有时候使用起来就比较乱。周末抽空从零搭建项目,一步步加新功能,也是让自己对spring配置有个更全面的了解。主要是对流程和配置的介绍,具体业务功能就比较省略。
一、搭建Spring MVC项目
这里是初步搭建完成的项目架构:

说到maven,这里推荐阿里云的镜像地址,如果不在公司或者公司没有私服的情况下,可以使用,下载贼快。
<mirror> <id>alimaven</id> <name>aliyun maven</name> <url>http://maven.aliyun.com/nexus/content/groups/public/</url> <mirrorOf>central</mirrorOf> </mirror>
1、Maven配置:
引入spring有关的包,这里我们暂时只用到spring-core和spring-webmvc和json包
<spring.version>4.3.3.RELEASE</spring.version> <!--spring配置 --> <dependency> <groupId>org.springframework</groupId> <artifactId>spring-core</artifactId> <version>${spring.version}</version> </dependency> <dependency> <groupId>org.springframework</groupId> <artifactId>spring-webmvc</artifactId> <version>${spring.version}</version> </dependency> <!--json配置 --> <dependency> <groupId>com.fasterxml.jackson.core</groupId> <artifactId>jackson-core</artifactId> <version>${json.version}</version> </dependency> <dependency> <groupId>com.fasterxml.jackson.core</groupId> <artifactId>jackson-databind</artifactId> <version>${json.version}</version> </dependency>
2、Spring配置
spring肯定扫不了配置文件,spring-core.xml,放在resources目录下
<?xml version="1.0" encoding="UTF-8"?> <beans xmlns="http://www.springframework.org/schema/beans" xmlns:xsi="http://www.w3.org/2001/XMLSchema-instance" xmlns:context="http://www.springframework.org/schema/context" xmlns:mvc="http://www.springframework.org/schema/mvc" xsi:schemaLocation="http://www.springframework.org/schema/beans http://www.springframework.org/schema/beans/spring-beans-3.0.xsd http://www.springframework.org/schema/context http://www.springframework.org/schema/context/spring-context.xsd http://www.springframework.org/schema/mvc http://www.springframework.org/schema/mvc/spring-mvc.xsd"> <!-- 启用spring mvc 注解 --> <mvc:annotation-driven /> <!-- 开启注解扫描--> <context:component-scan base-package="com.tan.self" /> <!-- json配置--> <bean class="org.springframework.web.servlet.mvc.method.annotation.RequestMappingHandlerAdapter"> <property name="messageConverters"> <list> <bean class="org.springframework.http.converter.json.MappingJackson2HttpMessageConverter" /> </list> </property> </bean> <!-- viewResolver配置--> <bean class="org.springframework.web.servlet.view.InternalResourceViewResolver"> <property name="prefix" value="/WEB-INF/jsp/"/> <property name="suffix" value=".jsp"/> </bean> </beans>
- < mvc:annotation-driven/> 会自动注册DefaultAnnotationHandlerMapping与AnnotationMethodHandlerAdapter 两个bean,是spring MVC为@Controllers分发请求所必须的
- < context:component-scan base-package=”com.tan.self” />用于开启注解扫描
- RequestMappingHandlerAdapter配置,配置json转换,用于spring中的@Responsebody注解,可以将返回值转换为json,注意,这里是spring4.x版本所用的配置,如果是低版本的话,用的是AnnotationMethodHandlerAdapter
- viewResolver配置,配置requestMapping返回页面的前缀和后缀
引用spring官方的说明:
< context:annotation-config> declares support for general annotations such as @Required, @Autowired, @PostConstruct, and so on.
< mvc:annotation-driven /> is actually rather pointless. It declares explicit support for annotation-driven MVC controllers (i.e.@RequestMapping, @Controller, etc), even though support for those is the default behaviour.
使用< context:component-scan/>后,该配置项其实也包含了自动注入上述processor的功能,即可将< context:annotation-config/>省去。
3、web.xml配置
- CharacterEncodingFilter字符过滤器,用于设置项目编码
- ContextLoaderListener用于启动Web容器时,自动装配ApplicationContext的配置信息
- DispatcherServlet用于路由分发
-
classpath:指定为我们配置的spring-core.xml,若不予配置的话,默认是/WEB-INF/applicationContext.xml
<!-- 字符编码过滤器--> <filter> <filter-name>characterEncodingFilter</filter-name> <filter-class>org.springframework.web.filter.CharacterEncodingFilter</filter-class> <init-param> <param-name>encoding</param-name> <param-value>UTF-8</param-value> </init-param> <init-param> <param-name>forceEncoding</param-name> <param-value>true</param-value> </init-param> </filter> <filter-mapping> <filter-name>characterEncodingFilter</filter-name> <url-pattern>/*</url-pattern> </filter-mapping> <!-- contextLoaderListener配置 启动Web容器时,自动装配ApplicationContext的配置信息--> <listener> <listener-class>org.springframework.web.context.ContextLoaderListener</listener-class> </listener> <context-param> <param-name>contextConfigLocation</param-name> <param-value>classpath:spring-core.xml</param-value> </context-param> <!-- dispatcherServlet配置--> <servlet> <servlet-name>DispatcherServlet</servlet-name> <servlet-class>org.springframework.web.servlet.DispatcherServlet</servlet-class> <init-param> <param-name>contextConfigLocation</param-name> <param-value>classpath:spring-core.xml</param-value> </init-param> <load-on-startup>1</load-on-startup> </servlet> <servlet-mapping> <servlet-name>DispatcherServlet</servlet-name> <url-pattern>/</url-pattern> </servlet-mapping>
4、示例代码
ApiController:
@Controller @ResponseBody @RequestMapping("api") public class ApiController { @RequestMapping("getJson") public RestResponse getApiJson() { RestResponse restResponse = new RestResponse(); restResponse.setCode(200); restResponse.setMsg("操作成功"); logger.info("获取json数据接口"); return restResponse; }
}
WebController:
@Controller @RequestMapping("web") public class WebController { @RequestMapping("index") public String webTest() { return "index"; }
RestResponse:
public class RestResponse { private int code; private String msg; private Object data; public int getCode() { return code; } public void setCode(int code) { this.code = code; } public String getMsg() { return msg; } public void setMsg(String msg) { this.msg = msg; } public Object getData() { return data; } public void setData(Object data) { this.data = data; }
}
index.jsp
<%@ page language="java" pageEncoding="UTF-8"%> <html> 欢迎光临 </html>
二、项目配置Jetty启动
项目配置和基础代码都已完毕,现在需要的是将web项目部署跑起来。一般而言,会使用tomcat作为服务器,进行部署,这里我们推荐Jetty,Jetty是一款轻量级的服务器,可以以插件的形式进行安装,非常便捷。
1、引入jetty插件
修改pom,增加插件引入:
<build> <plugins> <!--jetty --> <plugin> <groupId>org.mortbay.jetty</groupId> <artifactId>jetty-maven-plugin</artifactId> <version>7.6.14.v20131031</version> <configuration> <connectors> <connector implementation="org.eclipse.jetty.server.nio.SelectChannelConnector"> <port>80</port> </connector> </connectors> <stopKey>shutdown</stopKey> <stopPort>9090</stopPort> </configuration> </plugin> <!--编译版本 --> <plugin> <groupId>org.apache.maven.plugins</groupId> <artifactId>maven-compiler-plugin</artifactId> <configuration> <source>1.7</source> <target>1.7</target> </configuration> </plugin> </plugins> </build>
这里配置了两个plugin,一个是jetty-maven-plugin,可指定port为启动端口,一个是maven-compiler-plugin,指定编译版本,避免不同电脑不同环境下编译版本的差异(笔者的idea之前用于开发的时候,某项目编译打包版本一直是source1.5,必须每次在项目配置里面进行更改,非常繁琐,这里配置了source,就可以完美解决这种问题)
2、jetty启动
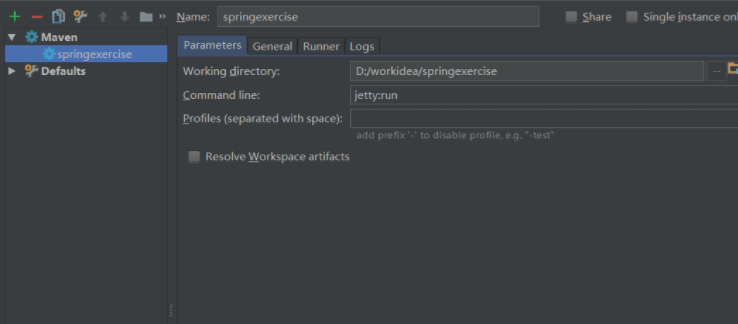
用jetty启动web项目也很方便,以idea为例,在Run–>Edit Configurations中新增Maven启动方式,配置如下:
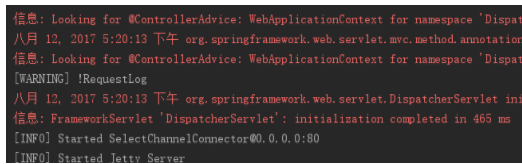
运行之:控制台打印如下,启动成功。
访问 http://localhost/api/getJson 查看返回的json数据
{ code: 200, msg: "操作成功", data: null }
访问 http://localhost/web/index 查看返回的页面
欢迎光临
三、集成Log4j2日志
项目搭建完毕后,笔者就集成了log4j的日志,但用的是slf4j和log4j1.x的版本,然后在log4j官网上看到:
On August 5, 2015 the Logging Services Project Management Committee announced that Log4j 1.x had reached end of life. For complete text of the announcement please see the Apache Blog. Users of Log4j 1 are recommended to upgrade to Apache Log4j 2.
原来log4j1.x版本自从15年起就已经不再维护了,官方也一直主推2.x版本,而且和以前方式也不大一样,于是改为Log4j2。
1、引入依赖
这里我们还是通过slf4j来使用log4j2,slf4j是一个接口工具类,通过它可以方便的切换log4j、logback等不同日志实现,推荐这种方式。
<slf4j.version>1.7.7</slf4j.version> <log4j.version>2.5</log4j.version> <!--slf4j log4j2配置 --> <dependency> <groupId>org.slf4j</groupId> <artifactId>slf4j-api</artifactId> <version>${slf4j.version}</version> </dependency> <dependency> <!-- 桥接:告诉Slf4j使用Log4j2 --> <groupId>org.apache.logging.log4j</groupId> <artifactId>log4j-slf4j-impl</artifactId> <version>${log4j.version}</version> </dependency> <dependency> <groupId>org.apache.logging.log4j</groupId> <artifactId>log4j-core</artifactId> <version>${log4j.version}</version> </dependency> <dependency> <groupId>org.apache.logging.log4j</groupId> <artifactId>log4j-api</artifactId> <version>${log4j.version}</version> </dependency>
2、log4j2配置
在resources目录下新建log4j2.xml文件,这是官方默认的路径和文件名。
<?xml version="1.0" encoding="UTF-8"?> <configuration status="error" monitorInterval="600"> <appenders> <Console name="Console" target="SYSTEM_OUT"> <PatternLayout pattern="%d{yyyy-MM-dd HH:mm:ss.SSS} %-5level %class{36} %L %M - %msg%xEx%n"/> </Console> <RollingFile name="RollingFile" fileName="/data/logs/web.log" filePattern="/data/logs/$${date:yyyy-MM}/web-%d{MM-dd-yyyy}-%i.log.gz"> <PatternLayout pattern="%d{yyyy-MM-dd 'at' HH:mm:ss z} %-5level %class{36} %L %M - %msg%xEx%n"/> <Policies> <TimeBasedTriggeringPolicy modulate="true" interval="1"/> </Policies> </RollingFile> </appenders> <loggers> <root level="info"> <appender-ref ref="RollingFile"/> <appender-ref ref="Console"/> </root> </loggers> </configuration>
具体的配置和Log4j1.x有点不太一样,但大同小异,这里我们主要介绍monitorInterval=”600”这个属性,之前我们的日志配置文件如果修改日志级别或者其他,需要重新启动项目,尤其对于已经上线的项目,非常不友好,而log4j配置里面新增的这一属性就是可以在不启动项目的情况下修改配置,monitorInterval是指log4j多久去重新读取一下配置,单位为秒,这里就是十分钟检测一次。

