Spring Cloud Stream 知识整理
概念 使用方法
目录
[TOC]
概念
1. 发布/订阅
简单的讲就是一种生产者,消费者模式。发布者是生产,将输出发布到数据中心,订阅者是消费者,订阅自己感兴趣的数据。当有数据到达数据中心时,就把数据发送给对应的订阅者。
2. 消费组
直观的理解就是一群消费者一起处理消息。需要注意的是:每个发送到消费组的数据,仅由消费组中的一个消费者处理。
3. 分区
类比于消费组,分区是将数据分区。举例:某应用有多个实例,都绑定到同一个数据中心,也就是不同实例都将数据发布到同一个数据中心。分区就是将数据中心的数据再细分成不同的区。为什么需要分区?因为即使是同一个应用,不同实例发布的数据类型可能不同,也希望这些数据由不同的消费者处理。这就需要,消费者可以仅订阅一个数据中心的部分数据。这就需要分区这个东西了。
Spring Cloud Stream简介
1. 应用模型
Spring Cloud Stream应用由第三方的中间件组成。应用间的通信通过输入通道(input channel)和输出通道(output channel)完成。这些通道是有Spring Cloud Stream 注入的。而通道与外部的代理(可以理解为上文所说的数据中心)的连接又是通过Binder实现的。
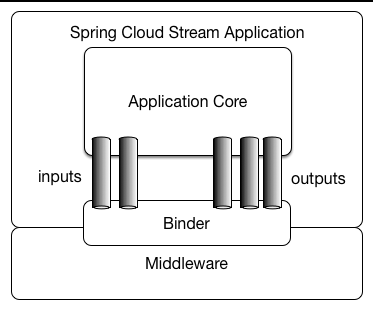
上图就是Spring Cloud Stream的应用模型。
1.1 可独立运行的jar
Spring Cloud Syream应用可以直接在IDE运行。这样会很方便测试。但在生产环境下,这是不适合的。Spring Boot为maven和Gradle提供了打包成可运行jar的工具,你可以使用这个工具将Spring Cloud Stream应用打包。
2. 抽象的Binder
Binder可以理解为提供了Middleware操作方法的类。Spring Cloud 提供了Binder抽象接口以及KafKa和Rabbit MQ的Binder的实现。
使用Spring Cloud Stream
1. 快速开始
这里先放出前面的应用模型图
下面例子使用的Middleware是Kafka,版本是kafka_2.11-1.0.0。Kafka使用的是默认配置,也就是从Kafka官网下载好后直接打开,不更改任何配置。
关于pom.xml中依赖的项目的版本问题,最好不该成别的版本,因为很大可能导致版本冲突。
1.1 pom.xml
<parent> <groupId>org.springframework.boot</groupId> <artifactId>spring-boot-starter-parent</artifactId> <version>1.5.8.RELEASE</version> </parent> <dependencyManagement> <dependencies> <dependency> <groupId>org.springframework.cloud</groupId> <artifactId>spring-cloud-stream-dependencies</artifactId> <version>Ditmars.RELEASE</version> <type>pom</type> <scope>import</scope> </dependency> </dependencies> </dependencyManagement> <dependencies> <dependency> <groupId>org.springframework.boot</groupId> <artifactId>spring-boot-starter</artifactId> <exclusions> <exclusion> <groupId>ch.qos.logback</groupId> <artifactId>logback-classic</artifactId> </exclusion> <exclusion> <groupId>ch.qos.logback</groupId> <artifactId>logback-core</artifactId> </exclusion> </exclusions> </dependency> <dependency> <groupId>org.springframework.cloud</groupId> <artifactId>spring-cloud-starter-stream-kafka</artifactId> </dependency> </dependencies>
需要注意的是:官网上的例子是没有下面配置的
<exclusions> <exclusion> <groupId>ch.qos.logback</groupId> <artifactId>logback-classic</artifactId> </exclusion> <exclusion> <groupId>ch.qos.logback</groupId> <artifactId>logback-core</artifactId> </exclusion> </exclusions>
但是在本人电脑上如果不加上上面那段配置就是报错,读者可以按照个人情况选择加不加。
简单说明一下以上配置
- <parent>...</parent>:这段代表继承spring-boot-starter-parent的配置。因为Spring Cloud Stream 依赖Spring Boot的自动配置,所以需要加上这段。
- <dependencyManagement>...</dependencyManagement>:这段是引入spring-cloud-stream-dependencies.pom.xml,该配置文件里含有Spring Cloud Stream 项目需要使用的jar包的信息(包名加版本号)
- <dependencies>...</dependencies>依赖两个starter
1.2 App.java
@EnableBinding(value = { Processor.class }) @SpringBootApplication public class App { public static void main(String[] args) { ConfigurableApplicationContext context = SpringApplication.run(App.class); // 注册处理函数 System.out.println("注册结果:" + setHander(context)); // 发送消息 System.out.println("发送结果:" + write(context)); } // 发送消息 public static boolean write(ConfigurableApplicationContext context) { Service service = context.getBean(Service.class); return service.write("狗子在吗?"); } // 注册接收到消息时的处理函数 public static boolean setHander(ConfigurableApplicationContext context) { Service service = context.getBean(Service.class); return service.subscribe(result -> { System.out.print("狗子收到消息:" + result.getPayload()); }); } }
上面使用了两个注解:@EnableBinding和@SpringBootApplication。@SpringBootApplication就不说了。@EnableBinding注解接收一个参数,参数类型是class。上面代码中,传入的参数是“Processor.class”,这是一个接口,定义了两个channel,分别是input和output。看名称就知道,一个是输出通道(input channel),一个是输出通道(output channel)。“@EnableBinding(value = { Processor.class })”这整段代表创建Processor定义的通道,并将通道和Binder绑定。
Porcessor是Spring Cloud Stream为方便使用而预先定义好的,除了Processor还有Sink和Source,这些接口定义了一些通道(channel),需要时,直接使用就好。我们也能自己定义通道(channel),如何定义下文会讲。
App类中的main方法调用了SpringApplication.run,接着调用了write和setHandler方法。方法很简单,上文有注释,不再赘述。
1.3 Service.java
@Component public class Service { @Autowired private Processor processor; public boolean write(String data) { return processor.output().send(MessageBuilder.withPayload(data).build()); } public boolean subscribe(MessageHandler handler) { return processor.input().subscribe(handler); } }
这是一个service类,封装了一些对通道的操作。
需要注意的是这段代码:
@Autowired private Processor processor;
前面说过,Processor是一个定义了输入输出通道的接口,并没有具体实现。Spring Cloud Stream会帮我们自动实现它。我们只需要获取它,并使用它。
接着看
processor.output().send(MessageBuilder.withPayload(data).build());
先是调用output()方法获取输出通道对象,接着调用send方法发送数据。send方法接收一个Message对象,这个对象不能直接new,需要使用MessageBuilder获取。
1.4 application.properties
spring.cloud.stream.bindings.input.destination=test spring.cloud.stream.bindings.output.destination=test
上面配置了目的地,类比于Kafka的Topic和RabbitMQ的队列的概念。
配置格式如下:
spring.cloud.stream.bindings.<channelName>.<key>=value
channelName就是管道名,key就是对应属性,这里是destination,代表目的地。
管道名,key的其他可选值下文会讲,这里不要强求全部弄懂,接着看就好。
1.4 总结
上面就是完整的例子了。对比前面给出的应用模型图,上面的代码和配置文件定义了Application Core(代码中的处理函数,发送消息的函数等等),创建了通道并和Binder绑定(@EnableBinding(value = { Processor.class }))。Middleware就是本节一开始说的Kafka。整个流程大概如下:
- 开启Middleware(Kafka)
- 创建通道并与Binder绑定(@EnableBinding)
- 编写操作通道的代码
- 在配置文件上配置目的地,组,Middleware的地址,端口等等
##使用Spring Cloud Stream
###1 声明和绑定通道(channel)
####1.1 声明通道
Spring Cloud Stream 可以有任意数量的通道。声明通道的方式很简单。下面先给出之前说过的Sink,Source,Processor接口的源码:
public interface Sink { String INPUT = "input"; @Input(Sink.INPUT) SubscribableChannel input(); } public interface Source { String OUTPUT = "output"; @Output(Source.OUTPUT) MessageChannel output(); } public interface Processor extends Source, Sink { }
简单吧,就是使用了@Input和@Output注解了方法。其中@Input注解的方法返回的是SubscribableChannel,@Output注解的方法返回的是MessageChannel。
声明通道(channel)的方法就是使用@Input和@Output注解方法。你想要多少通道就注解多少方法。
给通道命名
默认情况下,通道的名称就是注解的方法的名称,例如:
@Input public SubscribableChannel yyy();
那么该通道的名称就是yyy。也能够自己定义通道名称。只需要给@Input和@Output注解传入String类型参数就可以了,传入的参数就是该通道了名称。例如:
@Input("zzz") public SubscribableChannel yyy();
通道的名称就变成了zzz。
####1.2 创建和绑定通道
只需要使用@EnableBinding就能创建和绑定通道(channel)。
@EnableBinding(value={Sink.class,Source.class})
@EnableBinding注解接收的参数就是使用@Input或者@Output注解声明了通道(channel)的接口。Spring Cloud Stream会自动实现这些接口。
上文中说过,@Input和@Output注解的方法有相应的返回值,这些返回值就是对应的通道(channel)对象。要使用通道(channel)时,就只要获取到Spring Cloud Stream对这些接口的实现,再调用注解的方法获取到通道(channel)对象进行操作就可以了。如何获取接口的实现下文会讲。
绑定通道(channel)是指将通道(channel)和Binder进行绑定。因为Middleware不只一种,例如有Kafka,RabbitMQ。不同的Middleware有不同的Binder实现,通道(channel)与Middleware连接需要经过Binder,所以通道(channel)要与明确的Binder绑定。
如果类路径下只有一种Binder,Spring Cloud Stream会找到并绑定它,不需要我们进行配置。如果有多个就需要我们明确配置了,配置方式下文会讲。这里只需要知道@EnableBinding能帮我们自动实现接口,创建通道和实现通道与Binder的绑定就可以了。
获取绑定了的通道
使用了@EnableBinding注解后,Spring Cloud Stream 就会自动帮我们实现接口。那么,可以通过Spring支持的任何一种方式获取接口的实现,例如自动注入,getBean等方式,下面给出官方例子:
@Component public class SendingBean { private Source source; @Autowired public SendingBean(Source source) { this.source = source; } public void sayHello(String name) { source.output().send(MessageBuilder.withPayload(name).build()); } }
也能够直接注入通道(channel)
@Component public class SendingBean { private MessageChannel output; @Autowired public SendingBean(MessageChannel output) { this.output = output; } public void sayHello(String name) { output.send(MessageBuilder.withPayload(name).build()); } }
如果你给通道命名了,需要使用@Qualifier注解指明通道名称
@Component public class SendingBean { private MessageChannel output; @Autowired public SendingBean(@Qualifier("customOutput") MessageChannel output) { this.output = output; } public void sayHello(String name) { this.output.send(MessageBuilder.withPayload(name).build()); } }
2 生产和消费消息
2.1 生产消息
一种方式是调用通道(channel)的sned方法发布消息。还有就是使用Spring Intergration的方式生产数据
@EnableBinding(Source.class) public class TimerSource { @Value("${format}") private String format; @Bean @InboundChannelAdapter(value = Source.OUTPUT, poller = @Poller(fixedDelay = "${fixedDelay}", maxMessagesPerPoll = "1")) public MessageSource<String> timerMessageSource() { return () -> new GenericMessage<>(new SimpleDateFormat(format).format(new Date())); } }
Spring Cloud Stream是继承Spring Intergration的,所有Spring Cloud Stream 天然支持Spring Intergration的东西。
2.2 消费消息
一种方式是前面快速开始中的那样注册处理函数,这里不再赘述,下面将是使用@StreamListener注解对消息进行处理
使用@StreamListener的例子
@EnableBinding(value = { Processor.class }) @SpringBootApplication public class App { public static void main(String[] args) { ConfigurableApplicationContext context = SpringApplication.run(App.class); // 发送消息 System.out.println("发送结果:" + write(context)); } @StreamListener(Sink.INPUT) public void handler(String message) { System.out.print("狗子收到消息:" + message); } // 发送消息 public static boolean write(ConfigurableApplicationContext context) { Service service = context.getBean(Service.class); return service.write("狗子在吗?"); } }
这是快速开始的例子,在这将下面的代码去掉,换成@StreamListener
public static boolean setHander(ConfigurableApplicationContext context) { Service service = context.getBean(Service.class); return service.subscribe(result -> { System.out.print("狗子收到消息:" + result.getPayload()); }); }
@StreamListener接收的参数是要处理的通道(channel)的名,所注解的方法就是处理从通道获取到的数据的方法。方法的参数就是获取到的数据。
消息是带有Header的,类似Http的headler,上面有contentType属性指明消息类型。如果contentType是application/json,那么@Streamlistener会自动将数据转化成@StreamListener注解的方法的参数的类型。
注意:如果@StreamListener注解的方法有返回值,那么必须使用@SendTo注解指明返回的值写入哪个通道
@EnableBinding(Processor.class) public class TransformProcessor { @Autowired VotingService votingService; @StreamListener(Processor.INPUT) @SendTo(Processor.OUTPUT) public VoteResult handle(Vote vote) { return votingService.record(vote); } }

