背景
前面Java 实现长图文生成 中实现了一个基本的长图文生成工具,但遗留了一些问题
- 文字中包含英文字符时,分行计算问题
- 暂不支持竖排文字展示
其中英文字符的计算已经修复,主要是通过FontMetric来计算字符串实际占用绘制的长度,这一块不做多讲,本篇主要集中在竖排文字的支持
设计
有前面的基础,在做竖排文字支持上,本以为是比较简单就能接入的,而实际的实现过程中,颇为坎坷
1. 竖排文字绘制
首先需要支持竖排文字的绘制,使用Graphics2d进行绘制时,暂不支持竖排绘制方式,因此我们需要自己来实现
而设计思路也比较简单,一个字一个字的绘制,x坐标不变,y坐标依次增加
private void draw(Graphics2D g2d, String content, int x, int y, FontMetrics fontMetrics) { int lastY = y; for (int i = 0; i < content.length(); i ++) { g2d.drawString(content.charAt(i) + "", x, lastY); lastY += fontMetrics.charWidth(content.charAt(i)) + fontMetrics.getDescent(); } }
2. 自动换行
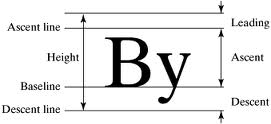
竖排的自动换行相比较与水平有点麻烦的是间隔问题,首先看下FontMertric的几个参数 ascent, descent, height
举一个例子来看如何进行自动换行
// 列容量 contain = 100 // FontMetric 相关信息: fontMetric.ascent = 18; fontMetric.descent = 4; fontMetric.height = 22; // 待绘制的内容为 content = "这是一个待绘制的文本长度,期待自动换行";
首先我们是需要获取内容的总长度,中文还比较好说,都是方块的,可以直接用 fontMetrics.stringWidth(content) 获取内容长度(实际为宽度),然后需要加空格(即descent)
所以计算最终的行数可以如下
// 72 int l = fontMetrics.getDescent() * (content.length() - 1); // 5 int lineNum = (int) Math.ceil((fontMetrics.stringWidth(str) + l) / (float) lineLen);
根据上面的计算, l=72, lineNum=5;
然后就是一个字符一个字符的进行绘制,每次需要重新计算y坐标
tmpLen = fontMetrics.charWidth(str.charAt(i)) + fontMetrics.getDescent();
其次就是需要判断是否要换行
lastTotal += tmpLen; if(lastTotal > contain) { // 换行 }
3. 从右到左支持
从左到右还比较好说,y坐标一直增加,当绘制的内容超过当前的图片时,直接在扩展后的图片上(0,0)位置进行绘制即可;
而从右到左则需要计算偏移量,如下图

实现
1. 文本自动换行
实现一个公共方法,根据上面的思路用于文本的自动换行
public static String[] splitVerticalStr(String str, int lineLen, FontMetrics fontMetrics) { // 字体间距所占用的高度 int l = fontMetrics.getDescent() * (str.length() - 1); // 分的行数 int lineNum = (int) Math.ceil((fontMetrics.stringWidth(str) + l) / (float) lineLen); if (lineNum == 1) { return new String[]{str}; } String[] ans = new String[lineNum]; int strLen = str.length(); int lastTotal = 0; int lastIndex = 0; int ansIndex = 0; int tmpLen; for (int i = 0; i < strLen; i++) { tmpLen = fontMetrics.charWidth(str.charAt(i)) + fontMetrics.getDescent(); lastTotal += tmpLen; if (lastTotal > lineLen) { ans[ansIndex++] = str.substring(lastIndex, i); lastIndex = i; lastTotal = tmpLen; } } if (lastIndex < strLen) { ans[ansIndex] = str.substring(lastIndex); } return ans; }
上面的实现,唯一需要注意的是,换行时,y坐标自增的场景下,需要计算 fontMetric.descent 的值,否则换行偏移会有问题
2. 垂直文本的绘制
1. 起始y坐标计算
因为我们支持集中不同的对齐方式,所以在计算起始的y坐标时,会有出入, 实现如下
- 上对齐,则 y = 上边距
- 下对其, 则 y = 总高度 - 内容高度 - 下边距
- 居中, 则 y = (总高度 - 内容高度) / 2
/** * 垂直绘制时,根据不同的对其方式,计算起始的y坐标 * * @param topPadding 上边距 * @param bottomPadding 下边距 * @param height 总高度 * @param strSize 文本内容对应绘制的高度 * @param style 对其样式 * @return */ private static int calOffsetY(int topPadding, int bottomPadding, int height, int strSize, ImgCreateOptions.AlignStyle style) { if (style == ImgCreateOptions.AlignStyle.TOP) { return topPadding; } else if (style == ImgCreateOptions.AlignStyle.BOTTOM) { return height - bottomPadding - strSize; } else { return (height - strSize) >> 1; } }
2. 实际绘制y坐标计算
实际绘制中,y坐标还不能直接使用上面返回值,因为这个返回是字体的最上边对应的坐标,因此需要将实际绘制y坐标,向下偏移一个字
realY = calOffsetY(xxx) + fontMetrics.getAscent(); //... // 每当绘制完一个文本后,下个文本的Y坐标,需要加上这个文本所占用的高度+间距 realY += fontMetrics.charWidth(tmp.charAt(i)) + g2d.getFontMetrics().getDescent();
3. 换行时,x坐标计算
绘制方式的不同,从左到右与从右到左两种场景下,自动换行后,新行的x坐标的增量计算方式也是不同的
- 从左到右:
int fontWidth = 字体宽度 + 行间距 - 从右到左:
int fontWidth = - (字体宽度 + 行间距)
完整的实现逻辑如下
/** * 垂直文字绘制 * * @param g2d * @param content 待绘制的内容 * @param x 绘制的起始x坐标 * @param options 配置项 */ public static void drawVerticalContent(Graphics2D g2d, String content, int x, ImgCreateOptions options) { int topPadding = options.getTopPadding(); int bottomPadding = options.getBottomPadding(); g2d.setFont(options.getFont()); FontMetrics fontMetrics = g2d.getFontMetrics(); // 实际填充内容的高度, 需要排除上下间距 int contentH = options.getImgH() - options.getTopPadding() - options.getBottomPadding(); String[] strs = splitVerticalStr(content, contentH, g2d.getFontMetrics()); int fontWidth = options.getFont().getSize() + options.getLinePadding(); if (options.getDrawStyle() == ImgCreateOptions.DrawStyle.VERTICAL_RIGHT) { // 从右往左绘制时,偏移量为负 fontWidth = -fontWidth; } g2d.setColor(options.getFontColor()); int lastX = x, lastY, startY; for (String tmp : strs) { lastY = 0; startY = calOffsetY(topPadding, bottomPadding, options.getImgH(), fontMetrics.stringWidth(tmp) + fontMetrics.getDescent() * (tmp.length() - 1), options.getAlignStyle()) + fontMetrics.getAscent(); for (int i = 0; i < tmp.length(); i++) { g2d.drawString(tmp.charAt(i) + "", lastX, startY + lastY); lastY += g2d.getFontMetrics().charWidth(tmp.charAt(i)) + g2d.getFontMetrics().getDescent(); } lastX += fontWidth; } }
3. 垂直图片绘制
文本绘制实现之后,再来看图片,就简单很多了,因为没有换行的问题,所以只需要计算y坐标的值即可
此外当图片大于参数指定的高度时,对图片进行按照高度进行缩放处理;当小于高度时,就原图绘制即可
实现逻辑如下
public static int drawVerticalImage(BufferedImage source, BufferedImage dest, int x, ImgCreateOptions options) { Graphics2D g2d = getG2d(source); int h = Math.min(dest.getHeight(), options.getImgH() - options.getTopPadding() - options.getBottomPadding()); int w = h * dest.getWidth() / dest.getHeight(); int y = calOffsetY(options.getTopPadding(), options.getBottomPadding(), options.getImgH(), h, options.getAlignStyle()); // xxx 传入的x坐标,即 contentW 实际上已经包含了行间隔,因此不需额外添加 int drawX = x; if (options.getDrawStyle() == ImgCreateOptions.DrawStyle.VERTICAL_RIGHT) { drawX = source.getWidth() - w - drawX; } g2d.drawImage(dest, drawX, y, w, h, null); g2d.dispose(); return w; }
4. 封装类的实现
正如前面一篇博文中实现的水平图文生成的逻辑一样,垂直图文生成也采用之前的思路:
- 每次在文本绘制时,直接进行渲染;
- 记录实际内容绘制的宽度(这个宽度包括左or右边距)
- 每次绘制时,判断当前的画布是否容纳得下所有的内容
- 容的下,直接绘制即可
- 容不下,则需要扩充画布,生成一个更宽的画布,将原来的内容重新渲染在新画布上,然后在新画布上进行内容的填充
因为从左到右和从右到左的绘制在计算x坐标的增量时,扩充画布的重新绘制时,有些明显的区别,所以为了逻辑清晰,将两种场景分开,提供了两个方法
实现步骤:
- 计算实际绘制内容占用的宽度
- 判断是否需要扩充画布(需要则扩充)
- 绘制文本
- 更新内容的宽度
private Builder drawVerticalLeftContent(String content) { if (contentW == 0) { // 初始化边距 contentW = options.getLeftPadding(); } Graphics2D g2d = GraphicUtil.getG2d(result); g2d.setFont(options.getFont()); FontMetrics fontMetrics = g2d.getFontMetrics(); String[] strs = StringUtils.split(content, "\n"); if (strs.length == 0) { // empty line strs = new String[1]; strs[0] = " "; } int fontSize = fontMetrics.getFont().getSize(); int lineNum = GraphicUtil.calVerticalLineNum(strs, options.getImgH() - options.getBottomPadding() - options.getTopPadding(), fontMetrics); // 计算填写内容需要占用的宽度 int width = lineNum * (fontSize + options.getLinePadding()); if (result == null) { result = GraphicUtil.createImg( Math.max(width + options.getRightPadding() + options.getLeftPadding(), BASE_ADD_H), options.getImgH(), null); g2d = GraphicUtil.getG2d(result); } else if (result.getWidth() < contentW + width + options.getRightPadding()) { // 超过原来图片宽度的上限, 则需要扩充图片长度 result = GraphicUtil.createImg( result.getWidth() + Math.max(width + options.getRightPadding(), BASE_ADD_H), options.getImgH(), result); g2d = GraphicUtil.getG2d(result); } // 绘制文字 int index = 0; for (String str : strs) { GraphicUtil.drawVerticalContent(g2d, str, contentW + (fontSize + options.getLinePadding()) * (index ++) , options); } g2d.dispose(); contentW += width; return this; } private Builder drawVerticalRightContent(String content) { if(contentW == 0) { contentW = options.getRightPadding(); } Graphics2D g2d = GraphicUtil.getG2d(result); g2d.setFont(options.getFont()); FontMetrics fontMetrics = g2d.getFontMetrics(); String[] strs = StringUtils.split(content, "\n"); if (strs.length == 0) { // empty line strs = new String[1]; strs[0] = " "; } int fontSize = fontMetrics.getFont().getSize(); int lineNum = GraphicUtil.calVerticalLineNum(strs, options.getImgH() - options.getBottomPadding() - options.getTopPadding(), fontMetrics); // 计算填写内容需要占用的宽度 int width = lineNum * (fontSize + options.getLinePadding()); if (result == null) { result = GraphicUtil.createImg( Math.max(width + options.getRightPadding() + options.getLeftPadding(), BASE_ADD_H), options.getImgH(), null); g2d = GraphicUtil.getG2d(result); } else if (result.getWidth() < contentW + width + options.getLeftPadding()) { // 超过原来图片宽度的上限, 则需要扩充图片长度 int newW = result.getWidth() + Math.max(width + options.getLeftPadding(), BASE_ADD_H); result = GraphicUtil.createImg( newW, options.getImgH(), newW - result.getWidth(), 0, result); g2d = GraphicUtil.getG2d(result); } // 绘制文字 int index = 0; int offsetX = result.getWidth() - contentW; for (String str : strs) { GraphicUtil.drawVerticalContent(g2d, str, offsetX - (fontSize + options.getLinePadding()) * (++index) , options); } g2d.dispose(); contentW += width; return this; }
对比从左到右与从右到左,区别主要是两点
- 扩充时,在新画布上绘制原画布内容的x坐标计算,一个为0,一个为
新宽度-旧宽度 - offsetX 的计算
上面是文本绘制,图片绘制比较简单,基本上和水平绘制时,没什么区别,只不过是扩充时的w,h计算不同罢了
private Builder drawVerticalImage(BufferedImage bufferedImage) { int padding = options.getDrawStyle() == ImgCreateOptions.DrawStyle.VERTICAL_RIGHT ? options.getLeftPadding() : options.getRightPadding(); // 实际绘制图片的宽度 int bfImgW = bufferedImage.getHeight() > options.getImgH() ? bufferedImage.getWidth() * options.getImgH() / bufferedImage.getHeight() : bufferedImage.getWidth(); if(result == null) { result = GraphicUtil.createImg( Math.max(bfImgW + options.getLeftPadding() + options.getRightPadding(), BASE_ADD_H), options.getImgH(), null); } else if (result.getWidth() < contentW + bfImgW + padding) { int realW = result.getWidth() + Math.max(bfImgW + options.getLeftPadding() + options.getRightPadding(), BASE_ADD_H); int offsetX = options.getDrawStyle() == ImgCreateOptions.DrawStyle.VERTICAL_RIGHT ? realW - result.getWidth() : 0; result = GraphicUtil.createImg( realW, options.getImgH(), offsetX, 0, null); } int w = GraphicUtil.drawVerticalImage(result, bufferedImage, contentW, options); contentW += w + options.getLinePadding(); return this; }
5. 输出
上面是绘制的过程,绘制完毕之后,需要输出为图片的,因此对于这个输出需要再适配一把
再前一篇的基础上,输出新增了签名+背景的支持,这里一并说了
- 计算生成图片的宽高
- 有签名时,绘制签名背景,在最下方绘制签名文本
- 背景图片
- 绘制填充内容
public BufferedImage asImage() { int leftPadding = 0; int topPadding = 0; int bottomPadding = 0; if (border) { leftPadding = this.borderLeftPadding; topPadding = this.borderTopPadding; bottomPadding = this.borderBottomPadding; } int x = leftPadding; int y = topPadding; // 实际生成图片的宽, 高 int realW, realH; if (options.getImgW() == null) { // 垂直文本输出 realW = contentW + options.getLeftPadding() + options.getRightPadding(); realH = options.getImgH(); } else { // 水平文本输出 realW = options.getImgW(); realH = contentH + options.getBottomPadding(); } BufferedImage bf = new BufferedImage((leftPadding << 1) + realW, realH + topPadding + bottomPadding, BufferedImage.TYPE_INT_ARGB); Graphics2D g2d = GraphicUtil.getG2d(bf); // 绘制边框 if (border) { g2d.setColor(borderColor == null ? ColorUtil.OFF_WHITE : borderColor); g2d.fillRect(0, 0, realW + (leftPadding << 1), realH + topPadding + bottomPadding); // 绘制签名 g2d.setColor(Color.GRAY); // 图片生成时间 String date = DateFormatUtils.format(new Date(), "yyyy-MM-dd HH:mm:ss"); borderSignText = borderSignText + " " + date; int fSize = Math.min(15, realW / (borderSignText.length())); int addY = (borderBottomPadding - fSize) >> 1; g2d.setFont(new Font(ImgCreateOptions.DEFAULT_FONT.getName(), ImgCreateOptions.DEFAULT_FONT.getStyle(), fSize)); g2d.drawString(borderSignText, x, y + addY + realH + g2d.getFontMetrics().getAscent()); } // 绘制背景 if (options.getBgImg() == null) { g2d.setColor(bgColor == null ? Color.WHITE : bgColor); g2d.fillRect(x, y, realW, realH); } else { g2d.drawImage(options.getBgImg(), x, y, realW, realH, null); } // 绘制内容 if (options.getDrawStyle() == ImgCreateOptions.DrawStyle.VERTICAL_RIGHT) { x = bf.getWidth() - result.getWidth() - x; } g2d.drawImage(result, x, y, null); g2d.dispose(); return bf; }
测试
测试case
@Test public void testLocalGenVerticalImg() throws IOException { int h = 300; int leftPadding = 10; int topPadding = 10; int bottomPadding = 10; int linePadding = 10; Font font = new Font("手札体", Font.PLAIN, 18); ImgCreateWrapper.Builder build = ImgCreateWrapper.build() .setImgH(h) .setDrawStyle(ImgCreateOptions.DrawStyle.VERTICAL_LEFT) .setLeftPadding(leftPadding) .setTopPadding(topPadding) .setBottomPadding(bottomPadding) .setLinePadding(linePadding) .setFont(font) .setAlignStyle(ImgCreateOptions.AlignStyle.TOP) .setBgColor(Color.WHITE) .setBorder(true) .setBorderColor(0xFFF7EED6) ; BufferedReader reader = FileReadUtil.createLineRead("text/poem.txt"); String line; while ((line = reader.readLine()) != null) { build.drawContent(line); } build.setAlignStyle(ImgCreateOptions.AlignStyle.BOTTOM) .drawImage("/Users/yihui/Desktop/sina_out.jpg"); build.setFontColor(Color.BLUE).drawContent("后缀签名").drawContent("灰灰自动生成"); BufferedImage img = build.asImage(); ImageIO.write(img, "png", new File("/Users/yihui/Desktop/2out.png")); }
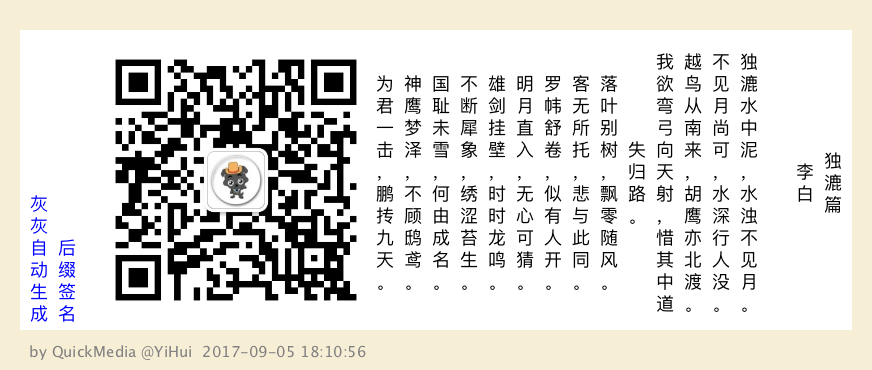
输出图片

再输出一个从右到左的,居中显示样式
其他
相关博文:《Java 实现长图文生成》
项目地址:https://github.com/liuyueyi/quick-media
个人博客:一灰的个人博客
公众号获取更多: