前言:
很多时候,面对从未了解的事物,我们总是束手无策,多希望有个人能指点一下,但更多的是你自己在十字路口徘徊,试遍了所有的可能性,也不一定能有所收获。
今天探索一个叫“NestedScrolling机制”,它能为我们解决嵌套滚动中,协调子view和父view滚动的协议。我会一步一步简述清楚我是如何去了解,应用NestedScrolling机制。
查阅:
1. 什么叫NestedScrolling机制?
上网查,了解它是用来干嘛的,有啥作用?所谓有对比就有伤害,以前一直使用百度进行各种资料的查阅,自从电脑可以愉快的翻墙后,慢慢转向谷歌搜索引擎,感受到一歀专注搜索引擎的强大。没有百度漫天飞舞的广告,精准定位搜索你想要的资料。
NestedScrolling机制能够让父view和子view在滚动时进行配合,而这个配合需要你(重写)去赋予它们。流程,大概是这样:
- 当子View 开始滚动之前,会通知父View,它要滑动(回调相应父view方法)
- 子View接收到父View的信号,做出相应的滚动(回调相应父view方法)
- 子View滚动之后,还可以通知父View继续滚动(回调相应父view方法)
在这些流程中,涉及到的API----》NestedScrollingParent,NestedScrollingChild两个接口。
其中,child是动作的发起者,Parent只是接收回调并作出相应。
2. 查阅谷歌android的APi中开发涉及的类
这里建议去官网查阅,不要去所谓的第三方,你是找不到的,很多资料都是旧的。那有人说:英文看着好累啊。翻译不懂吗?只要你坚持看下去,渐渐的你会发现语感变好,就一句话认识几个单词你就会大概知道啥意识。所以骚年们,吃得苦中苦方为人上人。
NestedScrollingChild:
官方解释:如果你一个嵌套滚动中的子View要和父View进行滑动合作,那么子View需要实现这个Child接口
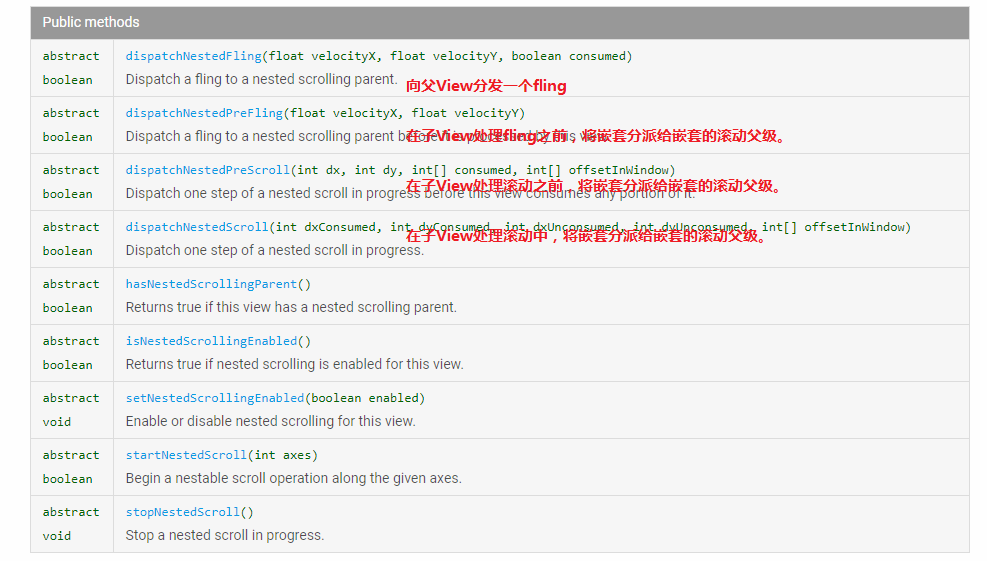
前四个方法中是比较重要的,都是返回为boolean类型,true代表父view消耗此事件,则反之。这里有几个参数需要说明下:
velocityX,velocityY分别表示滑动,滚动在相对起始位置的x,y的差值
consumed 第一个是boolean类型, 表示是否子View消耗此次滑动或滚动事件,第二个数组类型,表示父View消耗了多少x,y的差值
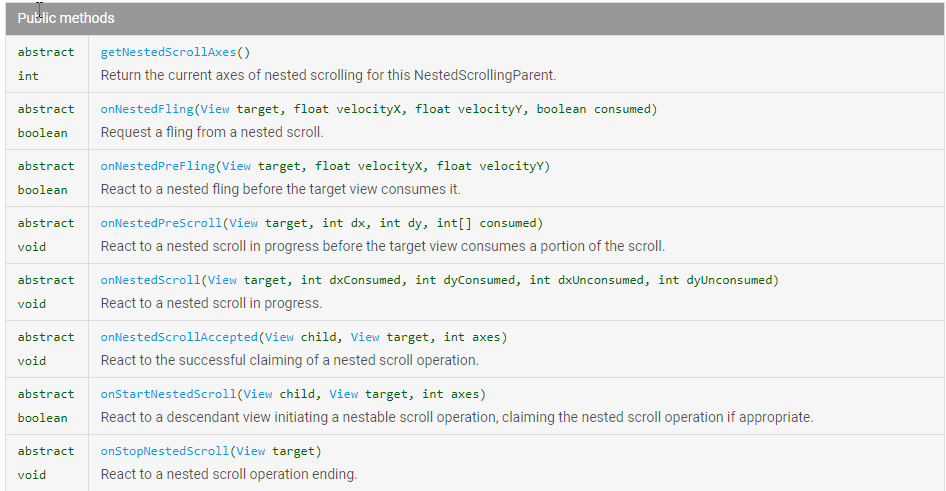
NestedScrollingParent:
官方解释:如果你一个嵌套滚动中的子View要和父View进行滑动合作,那么父View需要实现这个Parent接口
经过查阅中,child和parent中的方法其实都是一一对应的,在网上找了一张两者的交互对应流程:
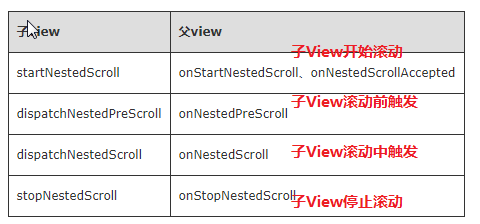
在onNestedPreScroll中consumed数值初始值始终为0,玛尼?都为0要它干嘛呢?这里的作用就是将父View 消耗的x,y的值进行赋值到consumed数组中,这样子View就会去判断父view是部分消耗还是全部消耗,从而根据剩余x,y进行滑动或滚动。
应用NestedScrolling机制:
先来看下效果图:
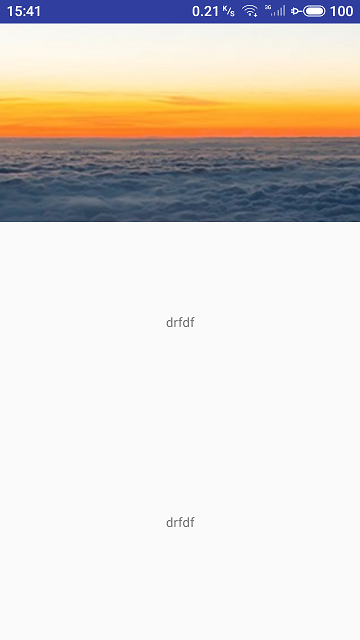

本想发给视频。好像不支持,就截几张图片吧。顶部一张图片,紧接着是RecycleView,滑动RecycleView,顶部图片就会先上/下滚动。
父容器实现接口NestedScrollParent:
class NestedLayout(context: Context?, attrs: AttributeSet?) : RelativeLayout(context, attrs), NestedScrollingParent2 { var top_height:Int = 0 override fun onNestedPreScroll(target: View, dx: Int, dy: Int, consumed: IntArray?, type: Int) { val hiddenTop = dy > 0 && scrollY < top_height val showTop = dy < 0 && scrollY >= 0 && !ViewCompat.canScrollVertically(target, -1) if (hiddenTop||showTop){ scrollBy(0,dy) consumed!![1]=dy //消耗此次滚动值,这样子View就不会滑动,如果去掉这句父View和子View同时滚动 } } override fun onSizeChanged(w: Int, h: Int, oldw: Int, oldh: Int) { super.onSizeChanged(w, h, oldw, oldh) top_height = image_head.measuredHeight } override fun onFinishInflate() { super.onFinishInflate() image_head= getChildAt(0) recyView = getChildAt(1) } override fun onStopNestedScroll(target: View, type: Int) { } override fun onStartNestedScroll(child: View, target: View, axes: Int, type: Int): Boolean { return true //true 表明父容器接受嵌套滚动,如果为false 则其他方法将不会调用 } override fun onNestedScrollAccepted(child: View, target: View, axes: Int, type: Int) { } override fun onNestedScroll(target: View, dxConsumed: Int, dyConsumed: Int, dxUnconsumed: Int, dyUnconsumed: Int, type: Int) { } override fun scrollTo(x: Int, y: Int) { var y = y if (y < 0) { y = 0 } if (y > top_height) {//以防止下拉超出image高度 y = top_height } if (y != scrollY) { super.scrollTo(x, y) } } private lateinit var image_head:View lateinit var recyView:View }
代码很简单,注释也都在里面,不废话了。那我们再来看下xml布局
<?xml version="1.0" encoding="utf-8"?> <com.hzb.minghuitong.view.NestedLayout xmlns:android="http://schemas.android.com/apk/res/android" xmlns:app="http://schemas.android.com/apk/res-auto" xmlns:tools="http://schemas.android.com/tools" android:layout_width="match_parent" android:layout_height="match_parent" android:fitsSystemWindows="true" tools:context="com.hzb.minghuitong.ui.UserActivity"> <ImageView android:id="@+id/head_iv" android:layout_width="match_parent" android:layout_height="200dp" android:background="@drawable/bg" /> <android.support.v7.widget.RecyclerView android:id="@+id/wg_recycleView" android:layout_width="match_parent" android:layout_height="match_parent" android:layout_below="@id/head_iv"></android.support.v7.widget.RecyclerView> </com.hzb.minghuitong.view.NestedLayout>
activity代码:
class UserActivity : AppCompatActivity() { private val dates=ArrayList<String>() override fun onCreate(savedInstanceState: Bundle?) { super.onCreate(savedInstanceState) setContentView(R.layout.activity_user) initView() } private fun initView() { dates.add("drfdf") dates.add("drfdf") dates.add("drfdf") dates.add("drfdf") wg_recycleView.layoutManager=LinearLayoutManager(this) wg_recycleView.adapter=MyAdapter(R.layout.item_test,dates) } }
感受下NestedScrolling机制的强大了吗?如果有了解最原始的实现方法,我想你肯定会吐槽的。

